
Table of Contents
ToggleA cramped kitchen with nowhere to stash dry goods doesn’t mean hopeless clutter. Converting an underused coat closet, hallway nook, or even a reach-in bedroom closet into a dedicated pantry solves storage woes without the expense of a full remodel. Unlike walk-in pantries that demand significant square footage, closet pantries work in tight quarters, provided the layout is thoughtful and every vertical inch earns its keep. This guide walks through design principles, shelving strategies, and real-world configurations that turn dead space into a hardworking pantry, along with organization tactics to maintain order long after installation.
Key Takeaways
- Closet pantry ideas transform underused coat closets, hallway nooks, and bedroom closets into dedicated storage for $200–$800, offering high ROI compared to full kitchen remodels for homes lacking cabinet space.
- Adjustable wire shelving and solid wood systems with 1-inch increment adjustability maximize vertical space; vertical spacing of 14–18 inches suits cereal and pasta boxes, while 10–12 inches works best for canned goods.
- Over-the-door racks, pull-out drawers, and tiered risers capture 20–30 percent additional storage without sacrificing shelf space, especially beneficial in narrow reach-in or shallow pantry configurations.
- Organizing by category using the first-in, first-out (FIFO) method, clear bins, and labeled shelf edges prevents expired goods and ensures every household member knows where items belong.
- Battery-operated LED strip lights and motion-sensor puck lights improve visibility and safety when retrieving items from deep shelves without requiring electrical work.
- Closet location within 10–15 feet of the kitchen minimizes preparation steps, while seasonal reviews every three to six months keep the pantry optimized as household needs evolve.
What Is a Closet Pantry and Why You Need One
A closet pantry is any enclosed vertical space repurposed for food and kitchen supply storage, typically a reach-in closet ranging from 24 to 36 inches deep and 36 to 72 inches wide. Standard residential closets work because shelf depth accommodates most dry goods, canned items, and small appliances without wasting space.
Homeowners choose closet pantries when kitchen cabinets max out or when open shelving isn’t practical. A closet door hides visual clutter, protects contents from light and dust, and keeps pets or toddlers away from breakables. For urban condos, older homes with galley kitchens, or new builds with minimal built-in storage, a closet pantry offers high ROI: materials run $200 to $800 for adjustable shelving systems, brackets, and bins, far less than cabinet expansion or kitchen addition costs.
Location matters. The ideal closet sits within 10 to 15 feet of the kitchen workspace to minimize steps during meal prep. Hallway linen closets, coat closets near the back door, or even a bedroom closet in an open-plan layout all work, provided the space isn’t load-bearing and doesn’t house HVAC, plumbing, or electrical panels that require code-mandated clearance.
Essential Design Elements for Maximum Storage Efficiency
Efficiency in a closet pantry hinges on adjustable shelving, strategic depth, and accessible hardware. Fixed shelves waste vertical space because cereal boxes, soup cans, and bulk bins demand different clearances.
Shelving Systems That Make Every Inch Count
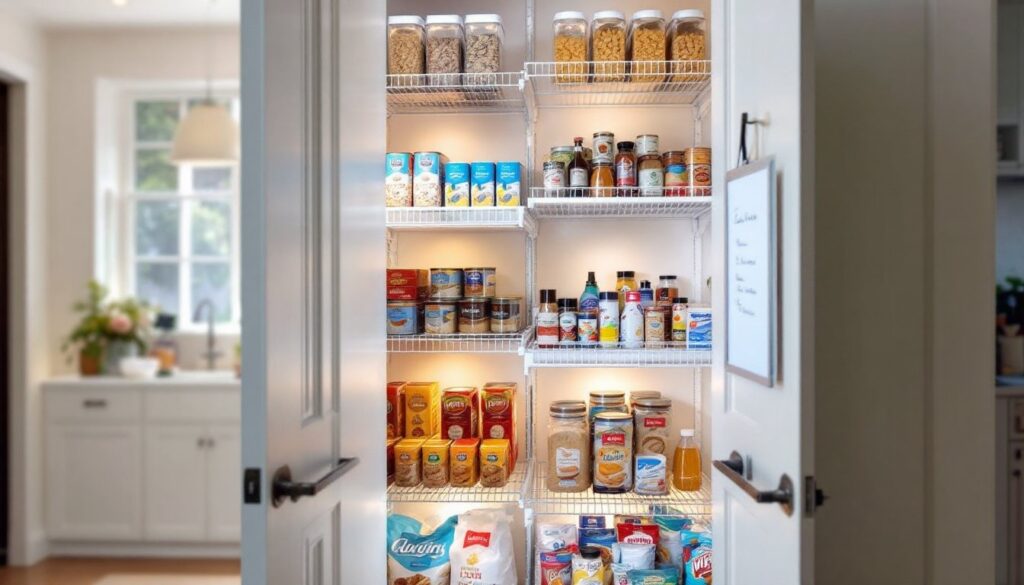
Adjustable wire shelving (ClosetMaid, Rubbermaid) remains the budget-friendly standard: tracks mount to wall studs, and shelves clip in at 1-inch increments. Wire allows air circulation, critical in humid climates to prevent mold on grain products, and shelf depth typically comes in 12-, 16-, or 20-inch options. For a standard 24-inch-deep closet, 16-inch shelves leave clearance for door swing and prevent items from getting lost in back corners.
Solid wood or melamine shelving suits those who prefer a finished look and plan to use bins or baskets: particleboard with a white melamine coating costs around $15 to $25 per 8-foot length at home centers. Cut to width with a circular saw (a miter saw yields cleaner crosscuts), and support with L-brackets or adjustable standards rated for 50 pounds per linear foot. Verify stud locations with a stud finder before mounting, drywall anchors alone won’t support bulk flour sacks or cases of canned goods.
Vertical spacing depends on inventory. Common configurations allocate 14 to 18 inches between shelves for cereal and pasta boxes, 10 to 12 inches for canned goods, and 6 to 8 inches for spice jars or condiment bottles. Installing a top shelf at 84 inches captures unused ceiling height for seasonal items or serving platters.
Door Storage Solutions for Easy Access
Over-the-door racks add 20 to 30 percent more storage without cutting into shelf space. Wire racks with adjustable baskets hang on standard hinged doors and hold spices, snack bars, or cleaning supplies. Ensure the door can close fully with the rack installed: some bifold or pocket doors lack clearance.
For heavier loads, like canned goods, mount a door-mounted shelf unit directly to the door panel using screws. Hollow-core doors require toggle bolts or blocking installed during construction: solid-core or wood doors accept screws into the face. Keep total weight under 30 pounds for hollow-core doors to prevent sagging or hinge failure.
Pull-out drawers at floor level maximize the bottom 12 inches, where fixed shelves create awkward bending. Rolling carts or wire drawer kits let users slide out bulk rice, pet food, or root vegetables. Installing drawer slides rated for 75 to 100 pounds ensures smooth operation even when fully loaded.
Creative Closet Pantry Configurations for Different Spaces
Not all closets share the same footprint, so shelf layout must adapt to width, depth, and door type.
Narrow reach-in closets (36 inches wide or less) benefit from single-column shelving that runs floor to ceiling. Stagger shelf heights to create zones: top shelves for seldom-used items, eye-level for daily staples, and lower shelves for heavy bags or bulk purchases. Adding a pull-out step stool (stored inside the closet) makes top shelves accessible without a ladder.
Wide closets (48 to 72 inches) allow L-shaped or U-shaped shelving that wraps side walls, leaving a narrow center aisle. This design maximizes linear shelf footage: a 60-inch-wide closet with 16-inch-deep shelves on three walls yields roughly 15 linear feet of storage. Use lazy Susans or tiered risers in corners to prevent dead zones where items get buried.
Shallow closets (18 to 20 inches deep) work for pantries if shelves are likewise shallow, 8 to 12 inches deep, so everything sits in a single row. This “one-deep” rule means no item hides behind another, improving visibility and reducing food waste. Many small kitchen solutions employ shallow pantries because narrow shelves fit tight galley layouts.
Bifold or sliding doors limit access compared to hinged doors. For bifold setups, avoid mounting anything on door backs that blocks the fold mechanism. Sliding doors obscure half the opening at any time, so configure shelves in left and right zones so users can slide the door to access each side fully.
If converting a coat closet, remove the existing rod and shelf. Patching screw holes in drywall with spackle and a putty knife takes 15 minutes: sand smooth, prime, and paint to match before installing new hardware. If the closet housed HVAC returns or electrical panels, consult local building codes, most jurisdictions require 30-inch clearance in front of electrical panels, making those closets unsuitable for pantry conversion.
Organization Tips to Keep Your Closet Pantry Functional
A well-designed closet pantry fails without consistent organization. Establishing zones and maintaining inventory prevents the chaos that sent users searching for solutions in the first place.
Zone by category: Group baking supplies (flour, sugar, baking soda) on one shelf, canned goods on another, snacks on a third. This mimics grocery store logic and speeds meal prep. Label shelf edges with a label maker or painter’s tape and a marker so everyone in the household knows where items belong.
Use clear bins and canisters for bulk items like rice, pasta, and oats. Airtight containers (OXO, Rubbermaid Brilliance) keep pests out and extend shelf life: a 4-quart container holds a standard 5-pound bag of flour. Clear sides let users check inventory at a glance, reducing duplicate purchases. Stackable square or rectangular bins maximize shelf real estate compared to round containers.
Rotate stock using the first-in, first-out (FIFO) method. Place new purchases at the back, pulling older items forward. This system minimizes expired goods and food waste. Adding a small dry-erase board to the inside of the door for a running grocery list captures out-of-stock items before the next shopping trip.
Adjustable risers create tiered storage on deep shelves, elevating back rows so labels remain visible. Designs similar to those highlighted in closet pantry conversions often incorporate risers to prevent cans or jars from disappearing.
Measure before buying bins. A 16-inch-deep shelf minus a 2-inch gap for the door leaves 14 inches of usable depth. Bins deeper than that won’t fit, and returns waste time. Bring a tape measure to the store or verify product dimensions online.
For households with children, store snacks and lunch-box items on lower shelves within reach. This fosters independence and reduces the number of times adults need to retrieve items. Heavy or breakable goods (glass jars, bulk cans) belong on mid-level shelves to minimize lifting strain and reduce fall hazards.
Lighting transforms usability. Battery-operated LED strip lights or motion-sensor puck lights install without electrical work and illuminate deep shelves. Stick-on strips adhere to the underside of each shelf: motion sensors trigger lights when the door opens. Adequate lighting prevents grabbing the wrong item and improves safety when reaching for top shelves.
Seasonal reviews keep the pantry optimized. Every three to six months, pull everything out, wipe shelves with a damp microfiber cloth, check expiration dates, and reassess shelf heights. As household needs shift, adding a baby, going gluten-free, buying a bread machine, adjust zones and spacing accordingly. Maintaining a well-organized closet ensures the pantry continues to serve its purpose rather than reverting to clutter.
Safety note: When installing shelving, always wear safety glasses to protect against metal shavings or wood splinters. Use a stud finder to locate framing, and pre-drill pilot holes to prevent splitting wood trim. If mounting heavy-duty standards into masonry or tile, use a hammer drill with masonry bits and appropriate anchors.
Conclusion
Closet pantries prove that smart design beats square footage. Adjustable shelving, door storage, and deliberate zoning turn overlooked closets into high-capacity food storage that rivals built-in pantries costing thousands more. Whether working with a narrow hallway niche or a wide bedroom closet, the principles remain the same: measure twice, mount to studs, and organize by category. With the strategies outlined here, and inspiration from resources like Martha Stewart’s home organization guides, any homeowner can reclaim kitchen counter space and bring order to the chaos of grocery hauls.