
Table of Contents
ToggleThe space beneath an elevated deck often becomes a dead zone, an eyesore that collects debris, becomes a haven for critters, or just looks unfinished. Installing lattice panels is one of the most practical and cost-effective ways to enclose that area while maintaining airflow and access. Whether a homeowner’s goal is to hide storage, keep animals out, or simply add curb appeal, lattice offers a versatile solution that works with nearly any architectural style. This guide explores proven lattice ideas, from traditional wood to modern composites, plus creative alternatives that go beyond the standard panel.
Key Takeaways
- Under deck lattice ideas provide a cost-effective way to enclose the space beneath elevated decks while maintaining airflow, blocking unwanted animals, and improving curb appeal.
- Lattice serves multiple functions including pest prevention, storage concealment, improved ventilation, and natural moisture reduction that protects deck structural integrity.
- Wood lattice (cedar, pine, or pressure-treated) remains the classic choice, while vinyl and composite options offer superior durability and require minimal maintenance in high-humidity environments.
- Installation success depends on proper framework support, elevated bottom edges (at least 2 inches above grade), treated lumber for ground contact, and sealed finishes applied before mounting.
- Creative under deck lattice alternatives include corrugated metal panels, louvered designs, privacy lattice, wrought iron inserts, and horizontal cable railing for customized aesthetic solutions.
- Building removable or hinged access panels within the skirting allows convenient access to stored items without removing entire lattice sections.
Why Install Lattice Under Your Deck?
Lattice serves multiple functions that go beyond aesthetics. First, it blocks unwanted visitors, raccoons, feral cats, and rodents love the dry, sheltered space under decks. A properly installed lattice panel with secure fasteners and buried lower edges discourages digging.
Second, it conceals clutter without creating a sealed cavity. Many homeowners use under-deck space for lawn equipment, pool chemicals, or seasonal storage. Lattice hides these items from view while allowing airflow that prevents moisture buildup and wood rot in the deck framing above.
Third, lattice improves curb appeal significantly. An exposed undercarriage of pressure-treated joists and posts rarely looks intentional. Lattice provides a finished appearance that ties the deck into the home’s exterior, especially when painted or stained to match trim or siding.
Finally, it supports natural ventilation. Unlike solid skirting, lattice allows air to circulate under the deck, reducing humidity and discouraging mold growth on structural members. This is especially important in regions with high humidity or frequent rainfall.
Before installation, homeowners should check local building codes. Some jurisdictions require vented skirting on decks to prevent gas accumulation if there’s a gas line nearby, or to meet fire safety standards. Lattice naturally satisfies most venting requirements.
Classic Wooden Lattice Designs
Traditional Diagonal Lattice Patterns
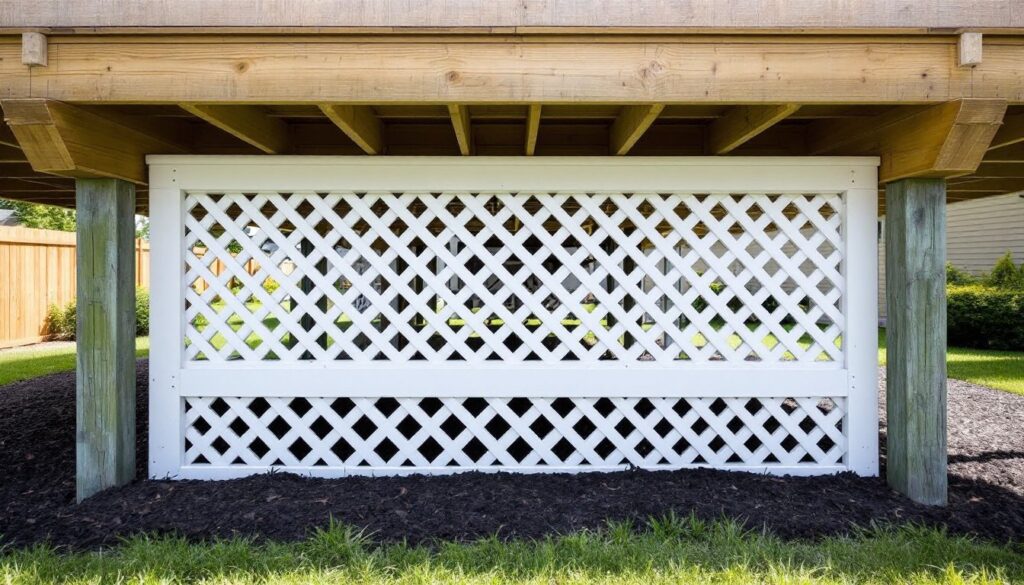
Diagonal lattice remains the most recognizable option, thin wood or vinyl strips crisscrossed at 45-degree angles to form diamond-shaped openings. Standard panels come in 2×8-foot or 4×8-foot sheets, with opening sizes typically ranging from 1¾ inches to 2¾ inches between slats.
Wood lattice is usually made from cedar, pine, or pressure-treated lumber. Cedar resists rot naturally and takes stain well, making it ideal for visible installations. Pine is the budget option but requires a quality exterior primer and paint to prevent decay. Pressure-treated lattice works for ground-contact applications but often has a green or brown tint that shows through lighter paint.
For a cleaner look, homeowners can frame each panel with 1×4 or 1×6 trim boards before mounting. This adds rigidity, hides cut edges, and gives the installation a custom appearance. Frame pieces should be fastened with galvanized or stainless steel screws, nails can back out over time as wood expands and contracts.
One common mistake: installing lattice panels too close to grade. The bottom edge should sit at least 2 inches above soil to prevent wicking moisture into the wood. For setups where the deck is close to ground level, embedding a treated 2×4 nailer slightly below grade and attaching the lattice above it keeps the panel elevated.
Horizontal and Vertical Slat Options
For a more contemporary or minimalist aesthetic, horizontal or vertical slat lattice offers clean lines without the busy diagonal pattern. These are often custom-built on-site using 1×2, 1×3, or 1×4 boards spaced evenly on a frame.
Horizontal slats create a modern, fence-like appearance. Spacing can be adjusted based on privacy needs and local wildlife, 2 to 4 inches between boards balances ventilation with security. This style works particularly well on Prairie, Craftsman, or mid-century modern homes.
Vertical slats give height emphasis and pair nicely with board-and-batten siding. They’re also easier to install on uneven terrain since each slat can be cut to length individually, following the grade without creating gaps.
Both styles benefit from woodworking project plans that include cut lists and spacing jigs to ensure consistent gaps. A simple jig made from scrap lumber speeds installation and prevents the “drift” that happens when eyeballing spacing across an 8-foot run.
Modern Vinyl and Composite Lattice Solutions
Vinyl lattice panels have largely replaced wood in many installations due to their durability and near-zero maintenance. Quality vinyl lattice won’t rot, splinter, or require painting. It’s available in white, tan, and gray, with the same standard 2×8 or 4×8-foot dimensions as wood.
The key difference is in the material thickness. Cheaper vinyl lattice uses thin, flexible strips that can sag or bow between supports. Premium options feature thicker crosspieces (often ¼-inch or more) and reinforced edges. These heavier panels require support posts no more than 4 feet apart, closer spacing prevents flexing under wind load or impact.
Vinyl expands and contracts more than wood, so fasteners should allow slight movement. Using pan-head screws with oversized pilot holes or specialized vinyl lattice clips prevents cracking during temperature swings. Never drive screws fully tight: leave about 1/16-inch gap to allow for expansion.
Composite lattice (a wood-fiber and plastic blend) splits the difference between wood and vinyl. It holds screws better than vinyl, resists moisture like plastic, and can be stained or painted if desired. Composite panels cost 20–40% more than vinyl but offer better rigidity and a more natural texture.
For coastal or high-humidity areas, vinyl and composite outperform wood significantly. They won’t harbor termites, won’t wick moisture, and maintain appearance for 15+ years without refinishing. The upfront cost premium pays off in reduced maintenance hours.
Creative Lattice Alternatives for Under Deck Areas
Not every deck suits traditional lattice. Several alternatives offer different aesthetics or functional benefits.
Corrugated metal panels (galvanized or painted steel) create an industrial or modern farmhouse look. They’re durable, pest-proof, and shed water effectively. Panels typically come in 2 or 3-foot widths and can be cut to length with tin snips. Use metal roofing screws with neoprene washers to prevent leaks and provide a clean finish. Metal reflects heat, so this option works better in shaded areas or cooler climates.
Louvered panels (horizontal angled slats) provide airflow while blocking line-of-sight. They’re often used in gate and fence designs but adapt well to deck skirting. Homeowners can find step-by-step DIY tutorials for building custom louvered panels with basic tools. A miter saw and pocket-hole jig simplify the process.
Privacy lattice uses tighter spacing or overlapping slats to obscure the under-deck area completely while still allowing some airflow. This works well when storage or utilities are visible but need screening.
Decorative wrought iron or aluminum inserts add a custom touch to higher-end installations. These panels fit within a trim frame and come in scrollwork, geometric, or Arts-and-Crafts patterns. They’re more expensive but extremely durable and low-maintenance.
Living walls or planter boxes attached to a structural frame can turn the under-deck area into a vertical garden. This approach requires careful waterproofing and drainage planning but offers a unique aesthetic. Pairing planters with a simple backing lattice for support creates a layered, finished look.
Another option gaining popularity: horizontal cable railing panels adapted for skirting. Stainless steel cables spaced 3 to 4 inches apart on a wood or metal frame provide a sleek, nearly invisible barrier. This works best where the view or landscaping beyond the deck is attractive and worth preserving.
Installation Tips and Best Practices
Proper installation makes the difference between lattice that lasts 15 years and panels that sag or rot within three.
Start with a solid framework. Lattice panels need support on all four sides. If the deck posts are spaced more than 4 feet apart, add intermediate 4×4 treated posts or 2×4 nailers between them. Dig postholes at least 18 inches deep (below frost line in cold climates) and set posts in concrete or use galvanized post anchors.
Create a perimeter frame. Use 1×4 or 2×4 treated lumber to build a frame between posts at the top and bottom. The bottom rail should sit 2–3 inches above grade. Secure rails with 3-inch exterior screws or structural fasteners. Check level and plumb as you go, nothing highlights poor installation like a wavy lattice line.
Cut panels to fit. Measure each opening individually: don’t assume they’re identical. Use a circular saw or jigsaw with a fine-tooth blade for wood, and a fine-tooth blade or scoring knife for vinyl. For cleaner cuts on vinyl, score both sides and snap along the line.
Attach panels with trim. Rather than fastening lattice directly, sandwich it between the nailer frame and 1×2 or 1×3 trim strips on the outside. This covers edges, allows easy removal for access, and looks far more finished. Use galvanized finish nails or trim screws.
Install access panels. Nobody wants to remove 20 feet of lattice to retrieve a lawn mower. Build at least one removable or hinged section for access to under-deck storage. Frame it like a gate with hinges and a simple latch.
Protect the bottom edge. Even treated lumber will wick moisture if sitting in damp soil or mulch. Consider embedding a pressure-treated 2×6 or landscape timber slightly below grade as a nailer, keeping the lattice itself elevated. Alternatively, install a 4–6 inch gravel bed under the deck perimeter to improve drainage and create a capillary break.
Seal and finish before installation. Staining or painting lattice after it’s up is tedious and leads to missed spots. Lay panels flat, apply two coats of exterior stain or acrylic latex paint, and let them cure fully before mounting. For beginner-friendly building guides, finishing in advance simplifies the process and improves results.
Safety note: Always wear safety glasses when cutting lattice, splinters and vinyl shards can fly. If using pressure-treated lumber, wear gloves and a dust mask during cutting: treated wood contains chemicals that shouldn’t be inhaled or absorbed through skin.
Permit requirements vary, but adding lattice skirting typically doesn’t require a permit since it’s not structural. But, if modifying the deck framing or digging post footings deeper than 18 inches, check with the local building department first. Some jurisdictions regulate any work involving footings or structural connections.