
Table of Contents
ToggleFlooring is one of those home upgrades that can eat through a budget faster than drywall dust settles on fresh paint. But here’s the good news: cheap doesn’t have to mean flimsy or ugly. In 2026, affordable flooring options have come a long way in durability, appearance, and ease of installation. Whether someone’s flipping a rental, updating a starter home, or just tired of staring at worn carpet, the right budget-friendly flooring can completely change a room without draining a savings account. This guide covers practical, proven options that deliver real results without requiring a home equity loan.
Key Takeaways
- Cheap flooring ideas like vinyl plank and laminate cost $1–$4 per square foot installed compared to $8–$15 for premium options, saving thousands on renovation projects.
- Luxury vinyl plank (LVP) offers the best value with water resistance, easy DIY installation, and realistic wood grain appearance at just $1.50–$3.50 per square foot.
- Peel-and-stick tiles provide the fastest and cheapest covering option at $0.50–$2 per square foot, ideal for renters and temporary solutions in low-traffic areas.
- Proper prep work—including acclimation, subfloor leveling, and surface cleaning—is essential to prevent gaps, buckling, and premature failure regardless of which budget flooring you choose.
- Painted concrete and plywood are overlooked creative solutions that cost roughly $1–$2 per square foot and work well for basements, garages, and specialty spaces.
- DIY installation, shopping sales, and renting tools instead of buying can save $200–$500 in labor costs per project while maintaining quality results.
Why Choose Budget Flooring?
Budget flooring isn’t about cutting corners, it’s about being strategic. High-end hardwood or porcelain tile can run $8–$15 per square foot installed, and that’s before adding underlayment, transitions, or disposal fees. For a 200-square-foot bedroom, that’s easily $2,000–$3,000.
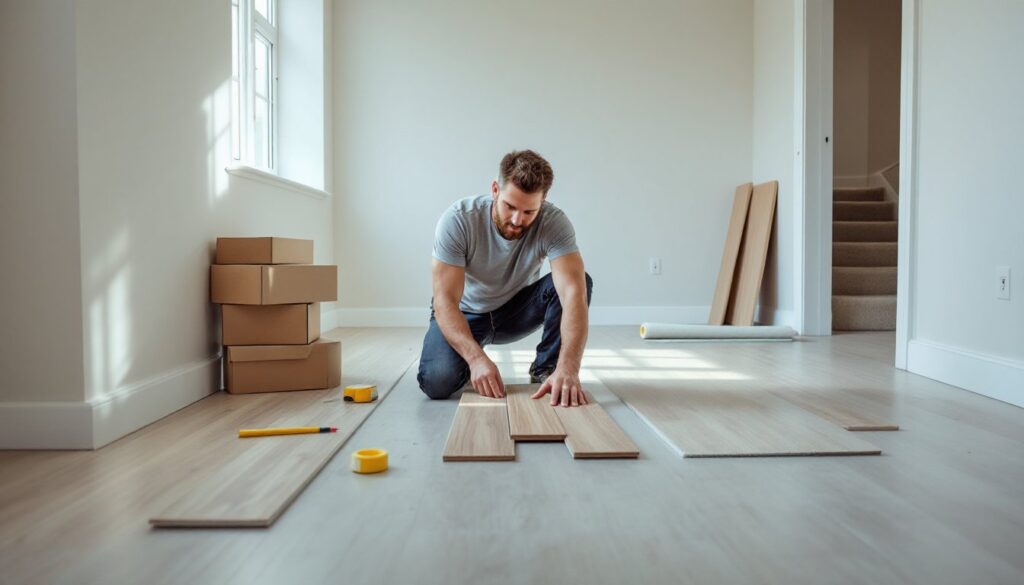
Cheaper alternatives like vinyl plank or laminate often cost $1–$4 per square foot for materials, and many are designed specifically for DIY installation. That means no contractor markup, no scheduling headaches, and the satisfaction of doing it yourself.
Another reason: flexibility. Renters, staging pros, and house flippers need flooring that looks good without a long-term commitment. Peel-and-stick tiles or floating floors can be removed or replaced without destroying the subfloor. And for homeowners planning to sell within a few years, spending $3,000 on luxury vinyl instead of $10,000 on engineered hardwood makes financial sense, especially since appraisals don’t always reward premium finishes dollar-for-dollar.
Vinyl Plank Flooring: The Best Value for Your Money
Luxury vinyl plank (LVP) has become the go-to for budget-conscious renovators, and for good reason. It mimics wood grain convincingly, stands up to moisture, and installs over most existing subfloors with minimal prep. Expect to pay $1.50–$3.50 per square foot for decent-quality LVP at big-box stores.
Look for planks with a wear layer of at least 12 mil for residential use, thinner layers scratch too easily. A 20 mil wear layer is better for high-traffic areas or homes with pets. The core matters, too: WPC (wood-plastic composite) cores are more forgiving over uneven subfloors, while SPC (stone-plastic composite) cores are denser and more dent-resistant.
Most LVP uses a click-lock floating installation, meaning no glue, no nails, just planks that snap together and rest on an underlayment. The whole system floats over the subfloor, which makes it easy to remove or replace later. Some manufacturers even integrate the underlayment pad directly onto the plank backing.
Installation tip: Acclimate the planks in the room for 48 hours before installation. Vinyl expands and contracts with temperature, and skipping acclimation can lead to gapping or buckling. Also, leave a 1/4-inch expansion gap around the perimeter, trim and baseboards will cover it.
For rooms with heavy moisture exposure (bathrooms, laundry rooms), make sure the product is labeled 100% waterproof, not just water-resistant. Water-resistant vinyl can still swell or delaminate if water sits on seams for too long.
Laminate Flooring: Affordable Elegance
Laminate flooring has been around longer than LVP and still holds its own in the budget category. It’s made from a high-density fiberboard (HDF) core topped with a photographic layer and a protective wear layer. Prices typically range from $1–$3 per square foot, making it one of the cheapest hard-surface options.
The catch: laminate doesn’t handle moisture well. The HDF core swells if water seeps into seams, so it’s a poor choice for bathrooms, basements, or kitchens prone to spills. For bedrooms, living rooms, and hallways, though, it’s a solid performer.
Laminate’s AC rating (Abrasion Criteria) indicates durability. AC3 is fine for moderate residential use: AC4 is better for busy households or light commercial spaces. Anything below AC3 is best avoided unless it’s for a closet or guest room that sees minimal foot traffic.
Like LVP, most laminate uses a click-lock floating system. Installation is straightforward, but the material is less forgiving of subfloor imperfections. Any bumps, dips, or debris will telegraph through the planks and can cause them to shift or crack over time. Self-leveling compound is cheap insurance, apply it to low spots before laying the floor.
One underrated benefit of laminate: it’s incredibly scratch-resistant compared to real wood. Pets, furniture, and dropped tools won’t leave the same marks they would on prefinished hardwood. For households with kids or dogs, that’s a meaningful advantage.
Peel-and-Stick Tiles for Quick DIY Installations
Peel-and-stick vinyl tiles are the fastest, cheapest way to cover an ugly floor, no tools required beyond a utility knife and a straight edge. Prices run from $0.50–$2 per square foot, and installation is literally peeling off a backing and pressing the tile down.
They work best over smooth, clean, level surfaces: existing vinyl, concrete, or plywood underlayment. Don’t try to stick them over textured tile, grouted seams, or particleboard, they won’t adhere properly and will lift at the edges within weeks.
The quality range is wide. Cheap big-box peel-and-stick tiles can look plasticky and peel up in high-traffic areas. Mid-range options with thicker vinyl and stronger adhesive hold up better and often include embossed textures that add visual interest. Some newer products mimic the look of wood planks or stone tile surprisingly well.
Many budget home makeovers use peel-and-stick tiles as temporary solutions in rentals or flip projects. They’re also popular for small accent areas, mudroom entryways, laundry closets, or powder rooms, where the lower durability isn’t a dealbreaker.
Pro tip: Start installation from the center of the room and work outward to keep the pattern symmetrical. Mark chalk lines as guides. And don’t skimp on surface prep, vacuum thoroughly, wipe down with TSP or degreaser, and let the floor dry completely before laying tiles. Any dust, grease, or moisture will prevent proper adhesion.
Painted Concrete and Plywood: Creative Low-Cost Solutions
Sometimes the cheapest floor is the one already there. Painted concrete has become a legitimate design choice, especially in basements, garages, and industrial-style spaces. With the right prep and products, it’s durable, easy to clean, and costs next to nothing.
Start by etching the concrete with muriatic acid or a commercial concrete etcher to open the pores and help paint adhere. Rinse thoroughly and let it dry for at least 24 hours. Then apply a concrete primer followed by epoxy or acrylic concrete floor paint. Epoxy is tougher and more chemical-resistant: acrylic is cheaper and easier to apply but won’t hold up as well to vehicle traffic or heavy use.
Finish with a clear polyurethane topcoat rated for floors. This adds scratch resistance and makes the surface easier to mop. The whole process, including drying time, takes a weekend and costs roughly $1–$2 per square foot for materials.
Painted plywood is another creative budget hack gaining traction in DIY decor projects. It’s particularly popular for attics, workshops, or upstairs bedrooms where the subfloor is already plywood and replacing it with something else feels wasteful.
Use 3/4-inch tongue-and-groove plywood for structural integrity. Sand it smooth (80-grit, then 120-grit), fill any gaps or knots with wood filler, and prime with a stain-blocking primer. Then apply porch and floor enamel paint, regular wall paint won’t hold up to foot traffic. Two coats of paint plus a polyurethane topcoat will give a surprisingly durable surface.
Patterns make a big difference. Stenciled designs, checkerboards, or even faux tile grout lines can turn plain plywood into a statement floor. It won’t fool anyone into thinking it’s marble, but it’s functional, unique, and costs about $1.50 per square foot in materials.
Cost-Saving Installation Tips
Do the demo yourself. Pulling up old carpet, vinyl, or laminate is tedious but not complicated. Rent a dumpster or use bagster bags for disposal. This alone can save $200–$500 in contractor labor.
Buy materials during sales. Big-box stores run flooring promotions around major holidays, Memorial Day, Labor Day, Black Friday. Stock up then, even if installation is a few weeks out. Flooring doesn’t expire.
Calculate square footage accurately. Measure the room’s length and width in feet, multiply, then add 10% for waste (cuts, mistakes, and future repairs). Ordering too little means delays and mismatched dye lots: ordering too much is just wasted money.
Reuse underlayment and trim when possible. If the existing underlayment is in good shape (no mold, no major dips), leave it. Same with baseboards and quarter-round, pull them carefully, label them, and reinstall after the new floor is down.
Rent tools instead of buying. A floor roller for vinyl or laminate, a jamb saw for undercutting door casings, or a pneumatic nailer for hardwood installation can each cost $50–$300 to buy. Rental rates are usually $20–$40 per day. For a one-time project, renting makes sense.
Skip the installer’s upsells. When comparing project planning tools and contractor quotes, watch for padding in labor estimates or unnecessary add-ons like “subfloor inspections” or “moisture testing” (unless there’s a known moisture issue). A confident DIYer can handle most of these checks with a level, a moisture meter, and common sense.
Conclusion
Cheap flooring doesn’t mean settling for trash. Vinyl plank, laminate, peel-and-stick tiles, and even painted surfaces can deliver durability and style without blowing a budget. The key is matching the product to the room’s demands and not skipping the prep work. Measure twice, acclimate materials, level the subfloor, and take time with installation, those steps make the difference between a floor that lasts a decade and one that looks rough after six months.