
Table of Contents
ToggleEpoxy countertops have surged in popularity among DIYers who want custom, high-end looks without the hefty price tag of natural stone. With a little patience and the right technique, homeowners can create marble veining, metallic swirls, ocean waves, or rustic wood-embedded surfaces that rival professional installations. The material itself, a two-part resin system, cures to a rock-hard, glossy finish that’s heat-resistant, waterproof, and surprisingly durable when properly applied. Whether refreshing laminate, plywood, or concrete substrates, epoxy offers creative freedom that few other countertop materials can match. Below are more than 15 design ideas to inspire the next kitchen upgrade.
Key Takeaways
- Epoxy countertops offer custom, high-end designs like marble veining and metallic swirls at a fraction of the cost of natural stone, costing just $100 to $300 for a DIY kitchen project.
- With proper surface preparation and a two-part resin system, epoxy countertops cure to a non-porous, heat-resistant finish that resists stains and can be completed in a weekend.
- Popular epoxy countertop designs include marble looks, metallic effects with pearlescent finishes, ocean-inspired layers with depth, and rustic wood-resin combinations.
- Safety is critical when working with epoxy: use a VOC-rated respirator during mixing, ensure proper ventilation, and keep the workspace dust-free to avoid health hazards and contamination.
- Maximize savings by resurfacing existing laminate or tile instead of replacing substrates, and avoid common cost mistakes like overbuying materials, skipping prep work, and rushing cure times.
Why Epoxy Countertops Are the Perfect DIY Upgrade
Epoxy resin is a thermosetting polymer that bonds to almost any clean, properly prepped surface, laminate, wood, tile, or concrete. Once mixed and poured, it self-levels into a seamless, glass-like coating up to 1/8 inch thick per layer. Most DIYers complete a standard kitchen counter in a weekend, though cure times vary from 24 to 72 hours depending on resin formulation and ambient temperature.
Unlike tile or stone, epoxy has no grout lines to trap bacteria or moisture. It’s non-porous when fully cured, making it resistant to stains from wine, coffee, and oils, provided the surface isn’t exposed to prolonged high heat or abrasive cleaners. Standard epoxy can handle brief contact with pots up to around 400°F, though trivets are still recommended for extended heat exposure.
The material cost runs $2 to $4 per square foot for clear resin, plus pigments and metallic powders, which is a fraction of quartz or granite slabs. Labor savings are significant: professional epoxy installations can run $50 to $100 per square foot, while a DIY project typically costs $100 to $300 for an average-sized kitchen, depending on design complexity and resin brand.
One caution: epoxy work requires good ventilation. Respirators with organic vapor cartridges (rated for VOCs) are non-negotiable during mixing and application. Open windows, use box fans to exhaust fumes, and keep pets and children out of the workspace until the resin has fully gassed off, usually 48 hours post-pour.
Marble-Look Epoxy Countertops for Timeless Elegance
Faux marble remains one of the most requested epoxy finishes, mimicking Carrara, Calacatta, or black-and-gold varieties without the weight or expense of real stone. The technique relies on layering white, gray, and black pigments in deliberate veining patterns, then using a heat gun or torch to spread and feather the colors before the resin kicks.
Start with a white or off-white base coat of tinted epoxy. While the resin is still wet, drizzle thin lines of gray and black using squeeze bottles or syringes. Drag a stick, toothpick, or plastic card through the lines at irregular angles to create natural-looking veins. A propane torch passed lightly over the surface (6 to 12 inches away) will pop air bubbles and gently spread pigments, softening hard edges.
For depth, some DIYers add a second translucent layer with additional veining after the first coat has cured to a tacky state (typically 4 to 6 hours). This simulates the subsurface striations found in real marble. Metallic gold or bronze powder can be dusted into the veins for a Calacatta gold effect.
Tip: Test color ratios on a small sample board first. Epoxy pigments concentrate as they cure, so what looks pale during mixing often darkens by 10 to 20 percent once hard. Keep photo references from design sourcebooks handy to guide vein placement and color balance.
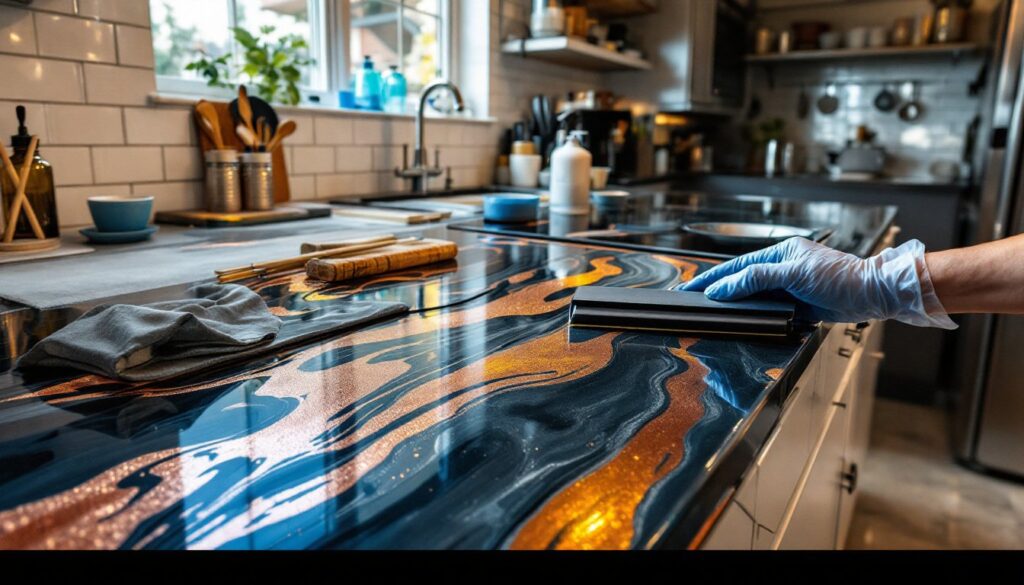
Metallic Epoxy Designs That Make a Bold Statement
Metallic epoxy uses fine aluminum or mica powders suspended in resin to create pearlescent, shifting color effects. The powder density, typically 4 to 6 percent by weight, determines opacity and shimmer intensity. Common metallic shades include silver, copper, gold, gunmetal, and rose gold.
Unlike solid pigments, metallics move and swirl as the resin flows. To enhance this, mix the powder into the resin, pour in overlapping ribbons, then use a foam brush, plastic squeegee, or even a leaf blower on low setting to push and pull the material across the surface. The result is a three-dimensional, almost liquid-metal appearance.
For a galaxy or geode effect, combine two or three metallic colors, deep purple with silver, teal with gold, or black with copper. Pour each color in irregular patches, then feather the edges together with a heat gun. Some installers embed crushed glass, glitter, or iridescent flakes between layers for extra sparkle.
Safety note: Metallic powders are extremely fine and can irritate lungs. Wear a dust mask (N95 or better) when measuring and mixing powders, and seal the container immediately after use. Work in a well-ventilated area and avoid creating airborne clouds.
Metallic finishes pair well with modern or industrial kitchens. They reflect light dynamically, making small spaces feel larger and adding visual interest without pattern overload.
Ocean-Inspired Epoxy Countertops with Waves and Depth
Ocean or beach-themed epoxy layers translucent blues, greens, whites, and sandy tans to mimic waves, coral reefs, or shoreline foam. The technique builds depth through multiple thin pours, each 1/8 to 1/4 inch thick, with pigments adjusted per layer to simulate water clarity and seafloor details.
Begin with a tan or beige base coat to represent sand. After it cures tacky, pour a translucent turquoise or teal layer, leaving some base visible along one edge to suggest a beach. While wet, add swirls of white and pale blue using a stick or air blow to create foam and wave crests. A torch pass will blend colors and release trapped air.
For added realism, embed crushed shells, sea glass, or fine sand into the base layer before the second pour. Small amounts of metallic pearl powder in the blue layers add a shimmering, sunlit-water effect. Some DIYers even add miniature resin sea creatures or coral pieces for a true aquarium look.
Curing tip: Ocean pours often use multiple layers, each requiring 24 hours to harden before the next. Plan for a three- to five-day project window and keep the workspace dust-free between pours. Cover the work area with plastic sheeting weighted at the edges to prevent debris from landing on tacky resin.
This style works beautifully in coastal kitchen designs, beach houses, or any space seeking a calm, organic focal point. The translucent layers catch and refract light, giving the countertop an ever-changing appearance throughout the day.
Rustic Wood and Epoxy Combinations for Warmth
Live-edge wood slabs embedded in clear or tinted epoxy create dramatic, organic countertops that highlight natural grain and knots. Popular species include walnut, maple, oak, and cherry, each offering distinct color and figure. The epoxy fills voids, cracks, and irregular edges, stabilizing the wood while adding a glossy, protective coating.
Start by selecting kiln-dried lumber with moisture content below 10 percent. Wet or green wood will continue to shrink and crack under epoxy, leading to delamination. Sand the wood to 120 or 150 grit and wipe with denatured alcohol to remove dust and oils.
Build a melamine or HDPE mold around the slab, sealing all seams with caulk or hot glue to prevent leaks. Pour a thin seal coat of epoxy over the wood first, using a foam brush to work it into cracks and grain. This prevents air bubbles from rising through the flood coat. After 4 to 6 hours, pour the flood coat to the desired thickness, 1/2 inch to 2 inches is common for river-table or countertop applications.
For a river table effect, position two live-edge slabs parallel with a gap between them, then fill the gap with tinted or metallic epoxy in blue, teal, or black to simulate flowing water. The contrast between natural wood and glossy resin creates a striking centerpiece.
Tool note: Flattening the cured surface requires a belt sander, random orbital sander, or router sled. Epoxy is hard, plan for several hours of sanding through grits from 80 to 400, followed by wet sanding to 1000 or 1500 for a polished finish. A buffing wheel with polishing compound brings out maximum clarity and shine.
Budget-Friendly Epoxy Countertop Tips for DIYers
Epoxy projects can stay affordable with smart planning and material choices. Standard clear epoxy resin (such as table-top or bar-top formulations) costs $40 to $80 per gallon kit, which typically covers 12 to 16 square feet at 1/8-inch thickness. Pigments and metallic powders add $5 to $15 per color, but a little goes a long way, most counters need only 2 to 3 ounces of pigment total.
To save money, resurface existing laminate or tile instead of tearing it out. Clean thoroughly with TSP (trisodium phosphate), rinse, and dry completely. Scuff the surface with 80-grit sandpaper to create tooth for adhesion. Fill any chips or seams with epoxy putty, sand smooth, then proceed with the epoxy pour. This approach eliminates disposal fees and substrate costs.
Buy resin in bulk if tackling multiple rooms or large islands. Gallon kits offer better per-ounce pricing than quart sizes. Some suppliers offer “B-stock” or cosmetic-second resin at discounts, perfectly functional but with minor packaging flaws.
Avoid common cost traps:
• Overbuying: Measure twice, calculate square footage, and add only 10 percent extra for waste. Epoxy has a limited working time once mixed, typically 30 to 45 minutes, so excess material often goes to waste.
• Skimping on prep: Poor surface prep causes delamination and air bubbles, requiring a full do-over. Spend the time on cleaning, sanding, and sealing.
• Cheap tools: Quality squeegees, mixing buckets, and stir sticks prevent contamination. Dollar-store brushes shed bristles into wet resin.
• Rushing cure times: Pouring a second layer before the first has properly cured leads to fisheyes, delamination, or soft spots.
For project planning tools and material calculators, many resin manufacturers offer free online guides that estimate quantities based on countertop dimensions and desired thickness. These tools reduce guesswork and help DIYers order the right amount the first time.
Conclusion
Epoxy countertops deliver custom, high-impact results at a fraction of professional costs, if tackled with patience, proper prep, and attention to safety. From marble veining to metallic swirls, ocean waves, and wood-resin hybrids, the design possibilities are nearly limitless. With the right resin, a few specialty tools, and a dust-free workspace, any DIYer can transform tired laminate or plywood into a showpiece surface that rivals stone or solid-surface installations.