
Table of Contents
ToggleA fire pit becomes the focal point of any outdoor space, but without proper edging, it’s just a hole with flames. The right border defines the pit’s footprint, contains heat and embers, prevents grass from creeping into the fire zone, and ties the feature into the rest of the landscape. Whether building a new pit or upgrading an existing one, edging choices range from stacked stone and fired brick to industrial steel and repurposed materials. This guide covers practical edging options for different budgets, aesthetics, and skill levels, with installation tips to keep borders stable for years.
Key Takeaways
- Proper fire pit edging serves dual purposes: it creates a non-combustible safety barrier of 12–18 inches wide and integrates the pit into your landscape design for visual impact.
- Natural stone, brick, metal, and budget-friendly edging options each offer distinct aesthetics and functionality—choose based on your climate, budget, and desired style, from rustic flagstone to modern Cor-Ten steel.
- A compacted gravel base (¾-inch crushed stone in 2-inch lifts) is essential for dimensional stability and prevents settling; add a concrete footing in freeze-thaw climates to avoid heaving and cracking.
- Fire pit edging installation requires thorough preparation including soil removal, proper base compaction, and lateral restraint (stakes or landscape edging every 12–18 inches) to ensure borders remain stable for years.
- Always verify local fire codes, call 811 before digging to locate utilities, and use only fire-safe fill materials like crushed lava rock or sand within the pit—avoid mulch or organic materials within 3 feet of the fire.
Why Fire Pit Edging Matters for Safety and Style
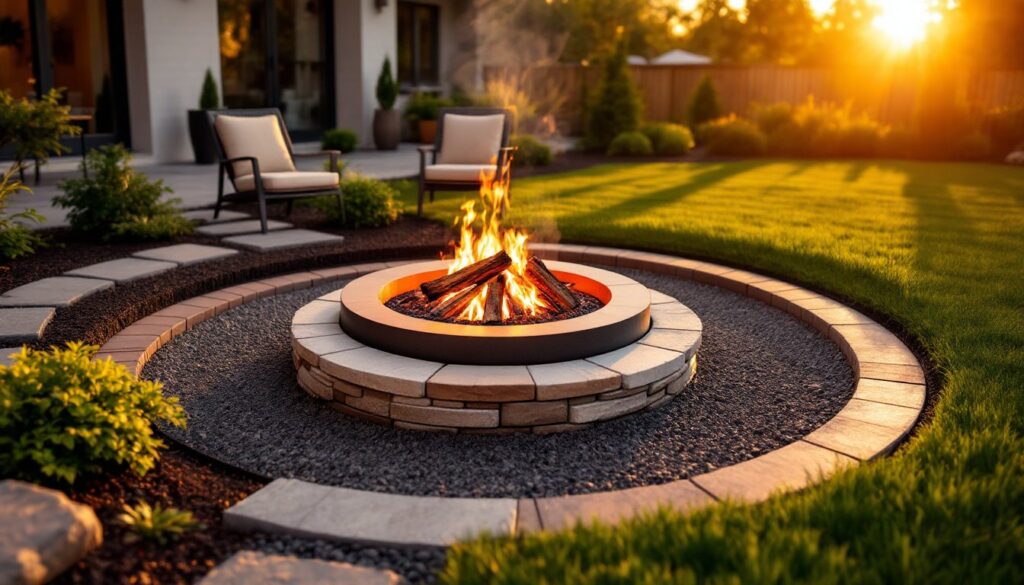
Fire pit edging serves dual purposes: it establishes a clear heat zone and elevates the visual impact of the entire outdoor area. From a safety standpoint, a properly installed border creates a non-combustible barrier at least 12–18 inches wide around the pit, preventing stray embers from landing on grass, mulch, or wooden decking. Many jurisdictions require fire pits to sit on a mineral base, crushed stone, gravel, or pavers, rather than directly on turf.
From a design perspective, edging integrates the fire pit into the broader landscape. A random stack of cinder blocks reads as temporary: a mortared brick surround or stacked flagstone coping signals permanence and care. Edging also simplifies lawn maintenance by eliminating the awkward transition where grass meets gravel or stone, reducing weed growth and keeping mulch from migrating into the pit area.
Before choosing materials, verify local fire codes. Some municipalities restrict open flames within a certain distance of structures, require spark screens, or mandate specific clearances above and around the pit. If the fire pit is gas-fed, edging design must accommodate gas lines and valve access. Always call 811 before digging to locate buried utilities.
Natural Stone Edging for a Rustic Outdoor Look
Natural stone delivers a timeless, organic aesthetic that weathers gracefully and complements woodland or cottage-style landscapes. Common choices include flagstone, fieldstone, and river rock.
Flagstone (typically 1.5–2.5 inches thick) works well as a flat coping or stepping surface around the pit. Irregular pieces fit together like a puzzle: dry-lay them on a 3–4 inch compacted gravel base, or mortar them onto a concrete footing for a more permanent install. Bluestone and limestone are popular for their consistent color, while sandstone offers warmer earth tones.
Fieldstone or rough-cut boulders create a naturalistic, stacked-wall effect. For a low border (12–18 inches), dry-stack works fine: use larger base stones and taper upward with smaller pieces. For anything taller, mortar joints and a concrete footing are necessary for stability. This approach suits sloped yards where the edging can double as a low retaining wall.
River rock or pea gravel (¾–1.5 inch diameter) functions as a loose, permeable surround rather than a structural edge. Spread a 2–3 inch layer over landscape fabric within a 3–4 foot radius of the pit. It’s inexpensive and drains well, but needs a solid border, steel or stone, to contain the gravel and prevent spreading.
Stone is heavy. Budget time for layout and adjustment, and rent a plate compactor ($50–75/day) to properly compact the gravel base. Expect to pay $4–12 per square foot for materials, depending on stone type and regional availability.
Brick and Paver Borders for Classic Appeal
Brick and concrete pavers offer modular, stackable options that suit both traditional and contemporary yards. Standard clay bricks (nominal 4×8×2.25 inches, actual 3.625×7.625×2.25 inches) are widely available and easy to work with. Firebricks, denser and rated for direct heat exposure, are ideal for the inner ring closest to flames, while common bricks handle the outer perimeter.
For a simple single-course border, excavate a trench 4–6 inches deep and wide enough to accommodate the brick laid on edge or flat. Add 3 inches of compacted base gravel, then lay bricks in a soldier course (vertical) or sailor course (horizontal). A thin layer of masonry sand between bricks allows minor adjustments. For a taller, two- or three-course wall, use Type S mortar or construction adhesive rated for outdoor use to bond courses. A mortared joint prevents shifting and weed growth.
Concrete pavers (tumbled, smooth, or textured) come in dozens of profiles and colors. Interlocking designs simplify installation and resist frost heave better than non-interlocking styles. For a modern, geometric look, large-format pavers (12×12 or 16×16 inches) create clean lines with minimal grout joints. Install on the same compacted gravel base as brick, and edge the perimeter with plastic or aluminum paver edging staked every 12 inches to prevent lateral creep.
Brick and paver projects are beginner-friendly. A 10-foot-diameter fire pit border typically requires 80–120 bricks or 25–35 large pavers. Material costs run $1–3 per brick or $2–6 per paver, plus base stone and edging. A masonry saw or angle grinder with a diamond blade ($30–40 rental) speeds cuts for curves and corners. Always wear safety goggles and a dust mask when cutting masonry.
Metal Edging Options for Modern Fire Pit Designs
Metal edging brings industrial elegance and crisp geometry to contemporary landscapes. Cor-Ten steel (weathering steel) is the go-to material for its self-sealing rust patina, which develops over several months and halts further corrosion. Panels or rings in 10- or 12-gauge thickness provide structural rigidity without bulky profiles.
Pre-fabricated fire pit rings (36–48 inches diameter, 12–18 inches tall) simplify installation: dig a shallow trench, set the ring level, and backfill with gravel. Custom-bent Cor-Ten edging allows irregular shapes: have a metal fabricator create panels to your dimensions, then stake or weld them in place. Expect the material to weep orange runoff during the first few rain cycles, avoid placement near light-colored stone or concrete that stains easily.
Aluminum landscape edging (⅛-inch thick, 4–6 inches tall) offers a budget-friendly alternative for lower borders. It’s lightweight, won’t rust, and bends easily around curves. Stake it every 3–4 feet with 10-inch aluminum stakes. While not as heat-tolerant as steel, aluminum works well for the outer perimeter when paired with stone or gravel closer to the flames.
Galvanized steel or black powder-coated steel edging is another option, though galvanized coatings can flake under high heat. Reserve these for decorative outer rings rather than the primary fire zone.
Metal edging pairs beautifully with decomposed granite or crushed stone, creating a clean, minimalist surround. Installation is faster than masonry, most projects take half a day. Material costs range from $3–8 per linear foot for Cor-Ten and $1–3 per foot for aluminum edging. Wear heavy gloves when handling raw steel edges.
Budget-Friendly DIY Edging Ideas
High-impact edging doesn’t require premium materials. Repurposed and locally sourced options deliver character at a fraction of retail pricing.
Reclaimed bricks from demolished buildings or old chimneys cost little to nothing if sourced from demo sites or online marketplaces. Clean off old mortar with a wire brush and hammer, then lay in a dry-stack or mortared pattern. Mismatched colors add rustic charm.
Concrete blocks or cinder blocks (nominal 8×8×16 inches) are utilitarian but functional. Lay them on a gravel base in a single course, oriented horizontally or vertically. Paint or stucco the exterior faces for a cleaner look. At roughly $1.50–2.50 per block, a small fire pit border runs under $50.
Landscape timbers or railroad ties offer a wood option, though they require treatment for ground contact and should sit at least 18 inches from open flames. Anchor 6×6 or 6×8 timbers with 12-inch rebar driven through pre-drilled holes. Timbers rot over time, expect 5–10 years in wet climates, but replacement is straightforward.
Dry-stacked flagstone scraps or broken pavers can be had cheaply from stone yards, which often sell “pallet ends” or irregular pieces at steep discounts. Fit them together like a mosaic around the pit perimeter. The irregular look suits cottage gardens and informal settings.
Crushed gravel or pea stone within a simple plastic landscape edging border is the most economical approach. Install 4-inch-tall poly edging ($0.50–1 per foot) staked every 3 feet, then fill with 2–3 inches of ¾-inch crushed stone. Total cost for a 10-foot ring: $30–50. It’s not glamorous, but it’s safe, drains well, and takes an afternoon to install.
Installation Tips for Long-Lasting Fire Pit Borders
Proper prep work separates borders that settle and shift from those that last decades. Start by marking the perimeter with spray paint or a garden hose, then excavate to the recommended depth, typically 4–6 inches for most edging materials. Remove all organic matter: roots, sod, and topsoil.
A compacted gravel base is non-negotiable for dimensional stability. Use ¾-inch crushed stone (also called ¾-minus or road base), which compacts tighter than rounded gravel. Spread in 2-inch lifts and compact each layer with a hand tamper or plate compactor. The base should be level or slope slightly away from the pit for drainage.
For mortared brick or stone, pour a 4-inch concrete footing below the frost line if you’re in a freeze-thaw climate. This prevents heaving and cracking. In mild regions, a well-compacted gravel base suffices.
Edging restraint keeps modular materials in place. Plastic or aluminum landscape edging, staked every 12–18 inches, works for pavers and bricks. Metal borders need stakes or ground anchors every 3–4 feet: in sandy or loose soil, pour a small concrete collar around each stake.
For natural stone or irregular shapes, backfill behind the edging with additional gravel or native soil, compacting as you go. This locks stones in place and prevents voids that collect water.
Capillary break: If edging abuts a lawn, install a 2-inch band of gravel or sand between the grass and the pit surround. This discourages roots and makes mowing easier.
Once edging is set, add fire-safe fill inside the perimeter: crushed lava rock, fire glass, or sand provide a clean, non-combustible surface. Avoid mulch, rubber, or any organic material within 3 feet of the fire.
Finally, test stability before lighting the first fire. Walk the perimeter, apply lateral pressure, and check for rocking or gaps. Make adjustments while the mortar (if used) is still workable. A solid edging job takes patience, but it pays off in safety and curb appeal.
Conclusion
Fire pit edging is where function meets design. The right border material and installation method protect the yard, clarify the fire zone, and enhance the overall aesthetic, whether aiming for rustic stone, classic brick, or sleek metal. With careful planning, a compacted base, and attention to local codes, a well-edged fire pit becomes a lasting centerpiece for outdoor gatherings.