
Table of Contents
ToggleChoosing flooring for a small bathroom isn’t just about covering square footage, it’s about making every inch count. The wrong material or pattern can shrink the space visually, trap moisture, or clash with a tight layout. Done right, flooring can anchor the design, expand sight lines, and hold up to years of water exposure without warping or staining. Whether working with a cramped half-bath or a narrow shower room, the floor sets the foundation for how the entire space feels, and functions.
Key Takeaways
- Large-format tiles and light-colored flooring are proven small bathroom flooring ideas that expand sight lines and reflect light, making cramped spaces feel airier and more open.
- Moisture resistance is non-negotiable in bathrooms—choose waterproof or water-resistant materials like porcelain tile, luxury vinyl plank, or LVT with ratings below 0.5% water absorption to prevent warping or staining.
- Luxury vinyl plank (LVP) offers a budget-friendly, 100% waterproof alternative to natural materials with realistic finishes and DIY-friendly click-lock installation that floats over existing subfloors.
- Bold patterns and geometric designs distract from small bathrooms’ tight dimensions by drawing visual interest to the floor itself, though mid-size tiles (4–8 inches) provide impact without overwhelming the space.
- Proper installation prep—including subfloor flatness checks, narrow grout lines (1/8 inch or less), and acclimation periods—prevents costly repairs and ensures small bathroom flooring withstands years of moisture exposure.
Why Your Flooring Choice Matters in a Small Bathroom
In a small bathroom, flooring does triple duty: it handles constant moisture exposure, defines the visual flow, and influences how large (or cramped) the room feels. A poorly chosen floor can highlight awkward dimensions, show every water spot, or require replacement within a few years.
Moisture resistance is non-negotiable. Bathrooms experience humidity spikes, standing water around tubs and toilets, and occasional flooding from overflows. Materials that absorb water, like untreated hardwood or laminate without waterproof cores, will swell, cup, or delaminate. Look for water-resistant or waterproof ratings, especially in wet zones near showers.
Visual continuity matters more in tight spaces. Breaking up the floor with too many grout lines, color shifts, or busy patterns can chop the room into smaller pieces. Conversely, running large tiles or planks wall-to-wall with minimal interruption extends sight lines and creates breathing room.
Maintenance and durability get tested daily in high-traffic, high-moisture environments. Grout that stains, surfaces that scratch easily, or finishes that dull under cleaning products add frustration. Choose materials that clean fast and age well without constant resealing or refinishing.
Finally, installation complexity affects budget and timeline. Some options, like porcelain tile over a modified mortar bed, require subfloor prep, waterproofing membrane, and precise leveling. Others, like click-lock vinyl planks, install over existing floors with basic tools. If hiring out, labor can double the material cost.
Large-Format Tiles: Creating the Illusion of More Space
Large-format tiles, typically 12×24 inches or larger, reduce grout lines and create a more expansive visual plane. Fewer seams mean the eye travels farther before hitting a break, making the floor feel less segmented.
Porcelain and ceramic tiles in these sizes perform well in wet areas. Porcelain has a lower water absorption rate (less than 0.5%) and higher density, making it ideal for floor installations that see splashes and standing water. Ceramic works too, but verify it’s rated for floor use and wet environments, not all wall tiles handle foot traffic or moisture equally.
When installing large-format tiles, subfloor flatness becomes critical. Variations beyond 1/8 inch over 10 feet can cause lippage (uneven tile edges) or cracking under weight. Use a self-leveling underlayment if needed, and work with a notched trowel sized for the tile thickness, typically 1/2×1/2 inch square-notch for tiles over 15 inches.
Grout line width should stay narrow, 1/8 inch or less, to maximize the seamless effect. Rectified tiles (mechanically cut to precise dimensions) allow tighter spacing. Choose a high-quality epoxy grout or urethane grout in a color close to the tile: these resist staining and moisture better than traditional cement grout, and they skip the sealing step.
For layout, start with a dry run. Center the tile pattern to avoid narrow slivers along visible walls, and plan cuts around the toilet flange and vanity. A wet saw with a diamond blade gives clean cuts on porcelain, though a tile snap cutter works for straight cuts on thinner ceramic.
Safety note: Always wear safety goggles and hearing protection when cutting tile, and use a dust mask or wet-cutting to control silica dust.
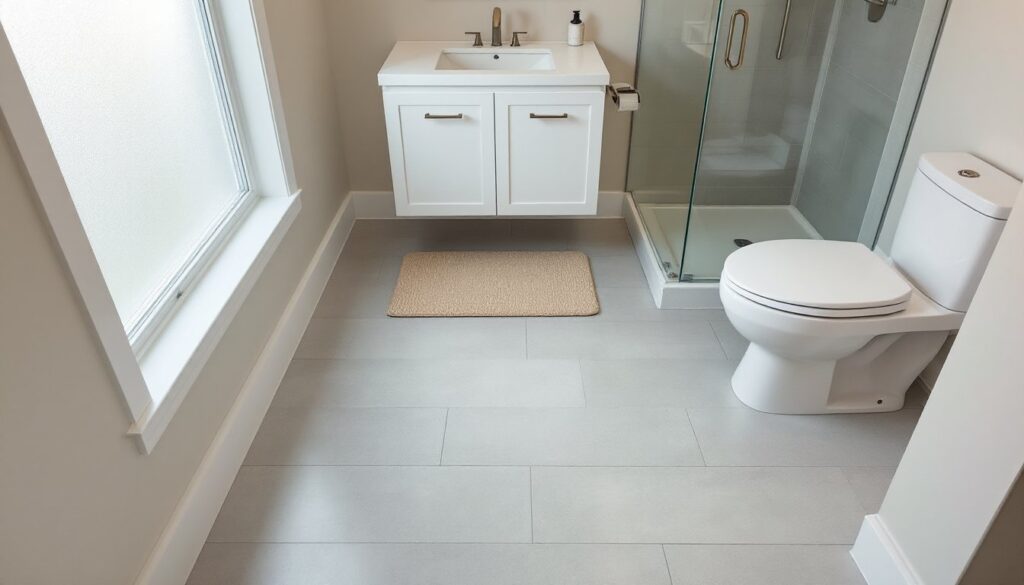
Light-Colored Flooring to Brighten and Open Up Your Bathroom
Light floors reflect more ambient and artificial light, which softens shadows and makes small bathrooms feel airier. White, beige, light gray, and pale taupe are workhorses for this effect, especially in bathrooms with limited natural light or dark wall colors.
Porcelain tile in matte or honed finishes hides water spots better than glossy surfaces while still bouncing light around the room. Polished finishes can be slippery when wet, check the tile’s coefficient of friction (COF) rating. For bathroom floors, aim for a dynamic COF of 0.42 or higher to meet ADA slip-resistance guidelines.
Luxury vinyl tile (LVT) in light wood-look or stone-look patterns offers a softer underfoot feel and built-in waterproofing. Many products feature a rigid core (SPC or WPC) that resists dents and temperature shifts, plus an attached underlayment that simplifies installation. LVT installs as floating floor or glue-down: floating is faster and DIY-friendly, while glue-down stays flatter in small spaces with heavy fixtures.
One common mistake: pairing light floors with light walls and fixtures can wash out the space, making it feel sterile rather than spacious. Introduce contrast through vanity color, hardware, or textured accents to anchor the design. Designers on platforms like homify often layer neutral floors with bold cabinetry or patterned shower tiles to keep the look balanced.
Maintenance tip: Light grout shows dirt, soap scum, and mildew faster than darker tones. If using tile, consider a medium gray grout (one or two shades darker than the tile) to split the difference between style and practicality.
Luxury Vinyl Plank: Waterproof and Budget-Friendly
Luxury vinyl plank (LVP) has become a go-to for small bathrooms thanks to its 100% waterproof core, realistic wood and stone visuals, and price point well below natural materials. Planks typically measure 6 to 9 inches wide by 36 to 48 inches long, and the longer format mimics hardwood while reducing seam count.
Look for products with a wear layer of 12 mil or thicker for residential bathrooms. The wear layer protects against scratches, stains, and UV fading. Thicker layers (20 mil and up) handle higher traffic and resist scuffs from dragged items or pet claws.
Core types break into three categories: WPC (wood-plastic composite), SPC (stone-plastic composite), and standard vinyl. WPC offers a softer, quieter feel and slight give underfoot, making it comfortable for long stretches. SPC is denser, more rigid, and better at bridging minor subfloor imperfections, ideal if installing over old tile or slightly uneven concrete. Standard vinyl is thinner and less forgiving but works over smooth, stable subfloors.
Installation typically uses a click-lock system that doesn’t require glue or nails. The planks snap together along tongue-and-groove edges and float over the subfloor with a thin foam underlayment (often pre-attached). A pull bar, tapping block, and utility knife are the main tools. Cut planks face-up with a sharp blade, scoring and snapping along the cut line.
Acclimation matters: Let planks sit in the bathroom for 48 hours before install so they adjust to the room’s temperature and humidity. Skipping this step can cause expansion or contraction gaps post-install.
Leave a 1/4-inch expansion gap around all walls, pipes, and fixed objects. Baseboards or quarter-round will cover the gap. If butting against a tub or shower, use a 100% silicone caulk bead along the seam for a waterproof transition.
Bold Patterns and Geometric Designs for Visual Interest
Patterned tile, encaustic cement, geometric porcelain, or printed ceramic, adds personality and draws the eye, which can distract from a bathroom’s small footprint. Instead of seeing four tight walls, visitors focus on the floor’s design.
Encaustic cement tiles offer intricate, hand-laid patterns with rich color palettes. They’re porous and require sealing (initially and annually), plus careful cleaning with pH-neutral products. Installation follows standard thin-set methods, but grout cleanup must happen quickly to avoid staining the surface. These tiles shine in powder rooms or low-traffic bathrooms where the maintenance trade-off is worth the visual payoff.
Geometric porcelain tiles, hexagons, diamonds, chevrons, or Moroccan-inspired shapes, bring pattern without the upkeep of cement. Porcelain’s density and low absorption make it bathroom-ready out of the box. Patterns can be bold (black-and-white checkerboard) or subtle (tonal grays in a basketweave layout).
For small bathrooms, scale matters. Tiny mosaics (1-inch hex or penny rounds) can overwhelm a cramped floor with grout lines and busyness. Mid-size patterns, 4-inch to 8-inch tiles in a repeating motif, offer punch without chaos. Creative approaches featured in powder room design roundups often use patterned tile as a focal “rug” in the center of the room, bordered by solid field tile to frame the design.
Installation tip: Patterned tiles often come on mesh-backed sheets for easier alignment. Lay out the full floor dry before setting anything in mortar to confirm pattern flow and minimize awkward cuts at edges. A tile spacer keeps joints consistent, and a laser level helps keep rows straight across longer runs.
If tackling a diagonal or herringbone layout, expect 15-20% waste from cutting. Rent a wet saw for the day to handle angled cuts cleanly.
Natural Stone and Wood-Look Options for Timeless Appeal
Natural stone, marble, travertine, slate, or limestone, brings texture, color variation, and a high-end look. Each tile is unique, which adds organic character that manufactured products can’t fully replicate. Stone also holds resale value and ages well if maintained.
Stone is porous and requires sealing before grouting and resealing every 12 to 24 months depending on use. Water and acidic cleaners (vinegar, lemon-based products) can etch or stain unsealed stone. Use a penetrating sealer designed for natural stone, applied with a foam brush or lambswool applicator, and buff off excess after 10–15 minutes.
Honed or tumbled finishes provide better slip resistance than polished stone, which can be dangerously slick when wet. Slate naturally offers texture and grip, making it a smart pick for high-moisture zones. It typically comes in 12×12-inch or 16×16-inch tiles with cleft (slightly uneven) surfaces that add rustic charm.
Installation follows standard tile methods: modified thin-set mortar over a cement backer board or mortar bed, with sanded grout for joints wider than 1/8 inch. Stone can be heavy, verify the subfloor can handle the load, especially on upper floors. 16×16-inch travertine can weigh over 5 pounds per square foot, plus mortar and backer.
Wood-look porcelain or LVP delivers the warmth of hardwood without the water sensitivity. Porcelain planks now replicate grain patterns, knots, and color variation so closely that most people can’t tell the difference from across the room. They install like any other tile, thin-set, grout, done. Wood-look LVP (covered earlier) offers a softer feel and faster install.
Small bathrooms benefit from narrow plank widths (4 to 6 inches) in lighter tones like white oak or driftwood gray. Wider planks can look disproportionate in tight quarters. Many homeowners update other elements during a bathroom makeover to coordinate new flooring with vanities, fixtures, and paint.
Conclusion
Small bathroom flooring isn’t about shrinking ambitions, it’s about making smart material and design choices that expand the space visually and hold up under real-world use. Whether going with large-format porcelain, waterproof LVP, or bold patterned tile, the floor anchors the room and sets the tone for everything above it. Measure twice, prep thoroughly, and don’t skip the underlayment or sealer. The right floor transforms a cramped bathroom into a space that works, and looks good doing it.