
Table of Contents
ToggleA small kitchen doesn’t mean sacrificing storage or style. The difference between cramped chaos and functional flow often comes down to smart shelving, vertical space that keeps counters clear and essentials within reach. Whether working with a galley layout, a studio apartment kitchenette, or just a tight footprint, the right shelf strategy turns walls, corners, and overlooked gaps into usable real estate. This guide walks through proven shelving solutions, from floating boards to corner units, that fit tight spaces, budgets, and skill levels.
Key Takeaways
- Small kitchen shelf ideas leverage vertical wall and ceiling space to maximize storage without requiring expensive cabinetry or taking up valuable floor area.
- Floating shelves cost $15–$80 per linear foot installed and can hold 12–15 dinner plates per 36-inch shelf, making them a budget-friendly alternative to traditional cabinets.
- Corner shelves and under-cabinet storage activate dead zones throughout compact kitchens, turning overlooked areas into functional storage for spices, mugs, and everyday essentials.
- Proper installation requires locating studs, using appropriate anchors for your shelf material (hardwood supports 25–50 lbs per foot; pipe brackets handle 40–60 lbs), and spacing shelves 12–18 inches apart for plates or 8–10 inches for spices.
- DIY options like reclaimed wood planks ($10–$20), black iron pipe brackets ($12–$18 per shelf), and wooden crates ($5–$15) deliver custom shelving on a budget without requiring specialized tools or welding.
Why Small Kitchen Shelving Is a Game-Changer for Compact Spaces
Open shelving reclaims vertical square footage without the visual weight or cost of upper cabinets. A single 36-inch floating shelf holds 12–15 dinner plates, freeing up cabinet space for appliances or pantry staples.
Key advantages:
- Accessibility: No door swings blocking narrow aisles: grab what you need in one motion.
- Cost efficiency: Shelves run $15–$80 per linear foot installed, compared to $150–$400 per linear foot for framed cabinets.
- Visual expansion: Open shelves avoid the boxed-in feel that full-height cabinets create in rooms under 100 square feet.
- Flexibility: Rearrange or remove shelves as needs change, no patching large cabinet footprints.
Downsides exist: dust settles faster, and clutter shows immediately. Items need to earn their spot through daily use or intentional display. Mixing open shelves with a few closed cabinets balances function and tidiness.
Floating Shelves: The Modern Solution for Tight Kitchens
Floating shelves mount flush to the wall with hidden brackets or threaded rods, creating clean horizontal lines. They work best in kitchens where every inch of floor and counter space counts.
Material and Load Considerations
Solid hardwood (oak, maple, walnut) supports 25–50 lbs per linear foot when mounted to studs with lag screws. Expect 1.5-inch nominal thickness (actual 1.25 inches) for shelves spanning 24–36 inches.
Plywood or MDF with veneer costs less but limit loads to 15–25 lbs per foot. Use these for spice jars, mugs, or cookbooks, not cast iron or small appliances.
Metal or industrial pipe shelves handle heavier loads (40–60 lbs) and suit urban or farmhouse aesthetics. Black iron pipe brackets run $8–$15 each: pair with reclaimed 2×10 boards for a budget-conscious look.
Installation Tips
- Locate studs with a stud finder: drywall anchors alone won’t hold kitchen loads safely.
- Use a level and mark both ends before drilling. A 1/8-inch slope over 36 inches is visible and frustrating.
- Pre-drill pilot holes in hardwood to prevent splitting near edges.
- Spacing: Mount shelves 12–18 inches apart for dinner plates and bowls: 8–10 inches for spices or stemware.
Safety note: Wear safety goggles when drilling overhead: tile or plaster dust can irritate eyes. If mounting over tile, use a carbide-tipped masonry bit and low drill speed to avoid cracking.
Corner Shelves That Turn Dead Space Into Storage Gold
Inside corners collect wasted square footage in most small kitchens. Corner shelves, whether floating triangles, lazy Susan-style, or L-shaped wraps, activate that zone.
Floating Triangle Shelves
Cut from 3/4-inch plywood or solid wood, these mount on two walls simultaneously. A 12-inch × 12-inch × 17-inch (hypotenuse) shelf fits snugly in standard 90-degree corners and holds coffee canisters, oils, or a small plant.
Build tip: Miter the two back edges at 45 degrees so they sit flush against both walls. Secure with 2.5-inch wood screws into studs on each wall, or use heavy-duty toggle anchors rated for 50 lbs if studs don’t align.
L-Shaped Wraparound Shelves
These extend 8–16 inches along each wall, creating a continuous surface. They’re ideal above a corner sink or stove where standard upper cabinets would block sightlines.
Many small-space kitchens benefit from affordable modular shelf systems that adapt to awkward corner dimensions without custom carpentry.
Rotating Corner Units
Similar to cabinet lazy Susans, these freestanding wire or wood units spin for easy access. Look for models 10–14 inches in diameter: larger versions overwhelm tight corners. They’re best for canned goods, spices, or baking supplies that don’t stack well on flat shelves.
Over-the-Sink and Window Shelving Ideas
The airspace above sinks and windows often goes unused, yet it’s prime territory for shallow shelving.
Over-the-Sink Shelves
A single shelf spanning the sink width (typically 24–36 inches) holds dish soap, sponges, and a drying rack for hand-washed items. Mount it 12–16 inches above the faucet to clear the spray zone but stay within easy reach.
Material choice: Stainless steel or sealed wood resists moisture better than particleboard. If using wood, apply polyurethane or marine-grade sealant to all surfaces before installation.
Bracket style: Triangular steel brackets (6–8 inches deep) support the shelf without visual bulk. Avoid ornate scrollwork that traps grease and grime.
Window Shelves
For kitchens with a window above the counter, a narrow shelf (3–5 inches deep) acts as a plant ledge or herb garden. Tempered glass shelves let light pass through: frosted or tinted glass adds privacy without curtains.
Installation: Use suction-cup shelf supports for renters, or drill into the window frame with 1.25-inch screws for permanent setups. Check that the frame is solid wood, not hollow vinyl, before committing.
Many design-focused sites like Apartment Therapy showcase clever window shelf layouts that balance function with natural light.
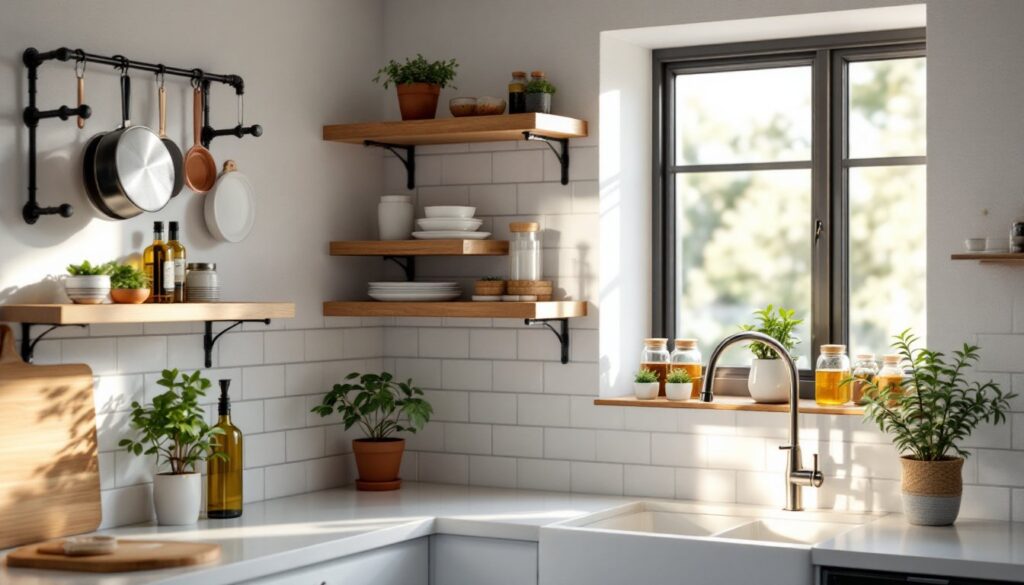
Under-Cabinet and Hanging Shelf Solutions
The underside of upper cabinets and the ceiling offer two often-missed planes for storage.
Under-Cabinet Racks
Mug hooks screw directly into cabinet bottoms (pre-drill to avoid splitting). Space hooks 3 inches apart: each holds one mug or measuring cup.
Wire basket trays (8–12 inches wide) slide or mount under cabinets to store coffee filters, tea bags, or sandwich bags. Look for models with integrated paper towel holders to consolidate functions.
Stemware racks hold wine glasses by the base, freeing cabinet shelf space. Ensure the rack depth doesn’t interfere with countertop work zones below.
Ceiling-Mounted Pot Racks
In kitchens with 8-foot or taller ceilings, a hanging pot rack keeps cookware accessible without cabinet real estate. Rectangular racks (24 × 18 inches) hold 6–8 pots and pans: oval or circular models fit over islands.
Critical installation detail: Ceiling joists must support the rack. Use a stud finder to locate joists, then install with 3-inch lag bolts rated for 200+ lbs. If joists don’t align, sister a 2×4 across two joists and mount the rack to that.
Safety: Never hang a pot rack from drywall alone. A loaded rack can weigh 40–60 lbs: inadequate anchoring risks injury and ceiling damage.
For renters or those avoiding structural changes, freestanding baker’s racks (12–18 inches deep, 60–72 inches tall) provide vertical storage without drilling. They’re less stable than wall-mounted options, so anchor the top to a stud or use furniture straps if in earthquake zones.
Creative DIY Shelf Ideas on a Budget
Custom shelving doesn’t require a full workshop or premium hardwood. A few creative swaps deliver function at a fraction of retail cost.
Reclaimed Wood Planks
Scour salvage yards, Craigslist, or renovation sites for barn boards, pallet wood, or old floor joists. Sand thoroughly to remove splinters and finish with tung oil or matte poly. A 6-foot plank often costs $10–$20 vs. $50+ for new hardwood.
Caution: Check for nails, staples, or rot before cutting. Wear work gloves and inspect edges for metal fragments that can damage saw blades.
Pipe and Bracket Combinations
Black iron pipe (3/4-inch diameter) and flanges create industrial-style brackets for $12–$18 per shelf. Pair with 1×8 or 1×10 pine boards (actual 3/4 × 7.25 or 3/4 × 9.25 inches) for a clean look.
Assembly:
- Cut pipe to desired bracket depth (6–10 inches).
- Thread flanges onto each end.
- Mount flanges to wall studs with 2.5-inch screws.
- Rest the board on the pipes: secure with small L-brackets if needed for stability.
No welding or special tools required, just a pipe cutter (or ask the hardware store to cut) and a drill.
Crate and Box Shelves
Wooden crates (wine boxes, fruit crates) mount horizontally as cubbies. Sand rough edges, stain or paint, then screw through the back into studs. Each crate costs $5–$15 and holds cookbooks, dry goods, or small appliances.
Functional kitchens featured on sites like The Kitchn often highlight budget-friendly DIY projects that prioritize practicality over perfection.
Rope and Board Hanging Shelves
For a bohemian or coastal vibe, suspend shelves from ceiling hooks with 1/2-inch natural fiber or nylon rope. Drill four holes near the corners of each board, thread rope through, and knot below. Hang from ceiling joists with eye bolts rated for dynamic loads.
Load limit: Rope shelves work for lightweight items (mugs, spices, decorative bowls), not cast iron or small appliances. Expect 10–15 lbs max per shelf to prevent excessive sway.
Conclusion
Small kitchens demand smart vertical thinking. Floating shelves, corner units, and overhead racks turn underused wall and ceiling space into practical storage without the footprint or expense of cabinetry. Whether installing budget pipe brackets or splurging on custom hardwood, the key is matching shelf depth, material, and mounting method to actual load and use. Measure twice, anchor to studs, and don’t skip prep work, the difference between a shelf that sags in six months and one that lasts a decade comes down to those basics.