
Table of Contents
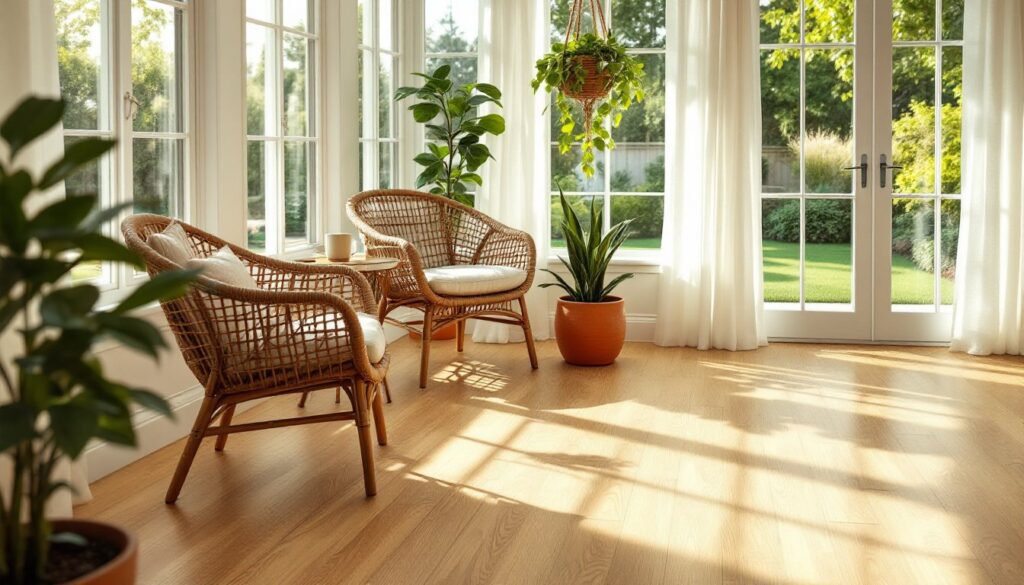
ToggleSunrooms occupy a unique zone in your home, part indoor comfort, part outdoor exposure. They’re bathed in natural light, subject to temperature swings, and often catch moisture from open windows or wet shoes tracking in from the patio. That means your flooring needs to do more than look good. It has to handle UV exposure without fading, resist moisture without warping, and stand up to foot traffic while maintaining comfort underfoot. Choose wrong, and you’ll be dealing with buckling boards or cracked grout within a couple of seasons. Choose right, and your sunroom becomes the most versatile space in the house, morning coffee spot, indoor garden, or year-round entertaining hub.
Key Takeaways
- Sunroom flooring must resist UV fading, moisture absorption, and temperature fluctuations—standard interior materials often fail in this demanding environment.
- Luxury vinyl plank (LVP) offers waterproof, fade-resistant performance with wood or stone aesthetics, making it the top choice for most sunrooms at $2–$6 per square foot.
- Ceramic and porcelain tile provide timeless durability and moisture imperviousness, with porcelain rated PEI 4–5 recommended for high-traffic sunrooms, though professional installation adds $5–$10 per square foot.
- Natural stone like slate and travertine deliver organic beauty but require annual sealing and careful maintenance with pH-neutral cleaners to prevent staining or etching.
- Engineered hardwood and polished concrete are viable alternatives—engineered hardwood adds warmth for climate-controlled spaces, while polished concrete offers modern, low-maintenance charm on existing slabs.
- Proper substrate preparation, vapor barriers over concrete, and appropriate underlayment are essential to prevent buckling, cracking, and moisture damage regardless of which sunroom flooring material you select.
Why Choosing the Right Flooring for Your Sunroom Matters
Sunrooms face environmental challenges that standard interior rooms don’t. Direct sunlight can fade or degrade certain materials, solid hardwood, for instance, can bleach or dry out over time without UV-resistant finishes. Temperature fluctuations are another factor. If your sunroom isn’t climate-controlled, flooring can expand and contract with the seasons, leading to gaps, buckling, or cracked tiles if the substrate wasn’t properly prepared.
Moisture is the third consideration. Even three-season sunrooms can trap humidity from plants, open windows, or wet footprints. Materials that aren’t moisture-resistant will swell, warp, or promote mold growth beneath the surface. And if your sunroom is built on a concrete slab, you’ll need a vapor barrier and proper underlayment to prevent moisture wicking up from below.
Finally, think about the room’s use. A sunroom that doubles as a mudroom or plant nursery needs flooring that’s easy to clean and won’t stain. One that’s furnished like a living room calls for warmth and comfort underfoot. Match the material to the function, and you’ll avoid costly do-overs.
Luxury Vinyl Plank: The Perfect Balance of Style and Durability
Luxury vinyl plank (LVP) has become the go-to for sunrooms, and for good reason. It’s waterproof, UV-resistant, and available in realistic wood-look or stone-look finishes that don’t sacrifice aesthetics. Modern LVP features a wear layer (measured in mils, look for 12–20 mil for residential use) that resists scratches, fading, and stains.
Installation is straightforward, especially with click-lock floating floors that don’t require glue or nails. You’ll need a flat, clean subfloor, concrete slabs should be within 3/16″ over 10 feet, and you’ll want a 6-mil polyethylene vapor barrier if installing over concrete. For sunrooms with radiant heat, confirm the LVP is rated for that application (most are, but check the manufacturer’s specs).
LVP handles temperature swings better than laminate because it’s dimensionally stable, it won’t expand or contract as aggressively. But, it’s still a good idea to leave a 1/4″ expansion gap around the perimeter and use matching transition strips at doorways.
One downside: cheaper LVP can feel hollow or sound loud underfoot. Adding a cork or foam underlayment (if the product doesn’t have an attached pad) improves acoustics and comfort. Expect to pay $2–$6 per square foot for quality LVP, plus underlayment and installation materials if you’re DIYing it.
Ceramic and Porcelain Tile: Timeless Elegance for Sun-Drenched Spaces
Porcelain and ceramic tile are sunroom classics. They’re impervious to moisture, won’t fade in direct sunlight, and handle temperature extremes without breaking a sweat. Porcelain is denser and more durable than ceramic, rated by the Porcelain Enamel Institute (PEI) from 1 to 5, with PEI 4 or 5 recommended for high-traffic sunrooms.
Tile installation requires a stable, level substrate. If you’re working over a concrete slab, ensure it’s cured, clean, and free of cracks. Use a crack isolation membrane if there’s any movement or existing hairline fractures, tile is rigid and will telegraph any subfloor issues. For wood subfloors (less common in sunrooms but possible), you’ll need 3/4″ exterior-grade plywood topped with cement backer board to prevent flexing.
Grout choice matters. Epoxy grout is more expensive but resists staining and moisture far better than standard cement grout, which can absorb spills and harbor mildew. Seal cement grout annually if you go that route. For a modern look, consider large-format tiles (12″×24″ or larger) with minimal grout lines.
Cost runs $3–$15+ per square foot depending on tile quality, plus thinset, grout, and backer board. DIY installation is doable with a wet saw for cuts, but expect a learning curve on layout and spacing. Many home renovation cost guides estimate professional tile installation at $5–$10 per square foot on top of materials.
Natural Stone Flooring: Bring Outdoor Beauty Inside
Natural stone, slate, travertine, limestone, or flagstone, delivers an organic aesthetic that blurs the line between indoors and out. It’s cool underfoot in summer, durable, and each piece is unique. Stone also holds up to UV exposure and moisture, though some types require more maintenance than others.
Slate is the most DIY-friendly option. It’s relatively affordable ($4–$10 per square foot), naturally slip-resistant, and available in earthy tones. Travertine offers a warmer, Mediterranean look but is more porous, seal it with a penetrating sealer to prevent staining. Limestone is softer and prone to scratching, so it’s better for low-traffic sunrooms.
Installation follows the same principles as ceramic tile: stable substrate, backer board over wood, thinset adhesive, and grout. Stone tiles vary in thickness, so use a medium-bed or large-and-heavy-tile mortar (ANSI A118.15) for better coverage. Lippage, uneven tile edges, is a common issue with natural stone: a leveling system can help keep things flush.
Maintenance involves annual sealing and pH-neutral cleaners, acidic products (like vinegar) can etch stone surfaces. Stone is also cold, so consider electric radiant heat mats beneath the tile if you’re in a colder climate. Mats run about $10–$15 per square foot and install directly in the thinset layer.
Engineered Hardwood: Warmth Without the Worry
Engineered hardwood gives you the look and feel of real wood with better dimensional stability than solid hardwood. It’s built from a hardwood veneer (usually 2–6 mm thick) over a plywood or HDF core, which resists expansion and contraction caused by humidity swings.
That said, engineered hardwood isn’t waterproof. It can handle occasional spills if cleaned quickly, but standing water or high humidity will cause edge swelling. It’s best suited for climate-controlled sunrooms or those with minimal moisture exposure. If your sunroom has a slab foundation, you’ll need a vapor barrier and a floating installation with foam underlayment, avoid glue-down or nail-down methods over concrete unless you’re certain there’s no moisture.
Look for UV-resistant finishes (often labeled as “aluminum oxide” or “UV-cured”) to minimize fading. Even with a protective finish, area rugs and UV-filtering window treatments help extend the floor’s life in sun-heavy rooms.
Engineered hardwood costs $3–$12 per square foot depending on species and veneer thickness. Installation is similar to LVP, most products use a click-lock system, but you’ll want a miter saw for clean end cuts and a pull bar and tapping block to close seams. It’s a solid weekend project if you’ve got basic carpentry skills. For design inspiration and product comparisons, platforms like Houzz for professionals and homeowners showcase real installations across different climates.
Concrete and Polished Concrete: Modern Industrial Charm
If your sunroom sits on a concrete slab, polishing or staining the existing surface is a cost-effective, low-maintenance option. Polished concrete is achieved by grinding the surface with progressively finer diamond pads, then applying a densifier and sealer. The result is a smooth, reflective finish that’s nearly indestructible and easy to clean.
DIY polishing requires renting a planetary grinder (around $100–$200 per day) and buying diamond pads in grits from 30 to 3000. It’s labor-intensive but doable for a patient DIYer. Alternatively, acid staining or epoxy coatings can add color and texture without the grinding process. Acid stains react with the concrete to create variegated, natural-looking tones: epoxy offers solid colors and high gloss.
Concrete is thermally conductive, so it stays cool in summer and can integrate radiant floor heating for winter warmth. It’s also hard, standing for long periods can be tough on feet and joints, so layering in area rugs helps. And while concrete is moisture-resistant, any cracks or spalling should be patched with a polymer-modified repair compound before finishing.
Cost is minimal if you’re working with an existing slab: stain kits run $50–$150, polishing materials $200–$400, plus tool rental. Professional polishing typically runs $3–$8 per square foot. For step-by-step guidance on concrete finishes and surface prep, comprehensive home improvement how-tos break down the process in detail.
Conclusion
Sunroom flooring isn’t one-size-fits-all. LVP and tile handle moisture and UV without flinching. Stone brings organic texture but demands upkeep. Engineered hardwood adds warmth if the room’s climate-controlled. Polished concrete keeps it simple and modern. Match the material to your sunroom’s exposure, use, and your tolerance for maintenance, and don’t skip the prep work. A solid substrate and proper underlayment will outlast the shiniest finish every time.