Table of Contents
TogglePallets offer a practical, low-cost route to building a backyard deck without the sticker shock of pressure-treated lumber or composite decking. They’re widely available, often free from warehouses, garden centers, or industrial sites, and come in standardized sizes that make planning straightforward. But not every pallet is deck-worthy, and shortcuts in prep or finishing can lead to splinters, rot, or premature failure. This guide walks through sourcing, treating, and building pallet decks that actually last, from simple ground-level platforms to elevated designs and custom features.
Key Takeaways
- Pallet decks can be built for under $200 using free or low-cost pallets, making them a budget-friendly alternative to pressure-treated lumber or composite decking.
- Only heat-treated (HT) pallets are safe for outdoor use; avoid any pallets stamped MB, and properly inspect, clean, sand, and seal all pallets before assembly to prevent rot and pest damage.
- Ground-level pallet deck designs work best for low-traffic areas and require minimal preparation, while elevated designs should not exceed 18 inches without checking local building codes and permit requirements.
- Proper maintenance, including resealing every 12–18 months and addressing splinters promptly, keeps pallet decks safe and extends their lifespan in outdoor conditions.
- Creative features like built-in seating, planters, lighting, and pergolas transform a basic pallet deck into a functional outdoor living space without significant additional cost or complexity.
Why Use Pallets for Your Deck Project?
The primary appeal is cost. A 10×12-foot pallet deck can be built for under $200 in materials when pallets are sourced for free and only fasteners, sealant, and foundation blocks are purchased. Compare that to standard pressure-treated decking at $3–$6 per board foot, and the savings add up quickly.
Pallets also offer structural integrity out of the box. Standard GMA (Grocery Manufacturers Association) pallets measure 48×40 inches and are built to carry thousands of pounds. Their cross-braced construction provides a ready-made framework, reducing cutting and framing work. Many beginners find them easier to work with than dimensioned lumber, since layout and spacing are mostly decided.
But, pallets aren’t a drop-in replacement for code-compliant decking lumber. Most are made from mixed hardwoods or softwoods with no treatment for ground contact or moisture. That means they’ll rot, warp, or attract pests unless properly treated. Also, pallets marked HT (heat-treated) are safe for DIY use, but avoid any stamped MB (methyl bromide), as that chemical treatment is toxic and banned in many countries.
Finally, pallet decks work best for low-traffic, non-structural applications, garden platforms, shed bases, or seating areas. They’re not suitable for elevated decks over 30 inches high, which in most jurisdictions require engineered framing, ledger board attachment, and a building permit per the International Residential Code (IRC).
Preparing and Treating Pallets for Outdoor Use
Start by inspecting every pallet. Look for HT stamps, reject any with chemical odors or stains, and check for cracks, rot, or loose boards. Hardwood pallets (oak, hickory) are denser and more durable: softwood pallets (pine, poplar) are lighter but less resistant to wear.
Clean pallets with a pressure washer or stiff brush to remove dirt, mold, and debris. Let them dry completely, this can take 3–5 days depending on humidity. Wet wood won’t accept sealant properly and can trap moisture, accelerating rot.
Next, sand high-traffic surfaces. Use an orbital sander with 80-grit sandpaper for deck tops and any exposed edges. This removes splinters and opens the wood grain for better penetration of sealant. Wear a dust mask, pallet wood often carries embedded dirt and microorganisms.
Apply an exterior wood sealant or deck stain rated for ground contact. Products containing copper napthenate or alkyd resins offer better moisture resistance than water-based sealants. Apply two coats, allowing 24 hours between applications. Pay extra attention to end grain and underside boards, where moisture intrusion starts. Some DIYers featured in woodworking project plans recommend applying sealant to all six sides of each pallet before assembly for maximum protection.
For ground-level decks, also treat the underside with a borate-based wood preservative to deter termites and carpenter ants. This is especially important in humid or southern climates where insect pressure is higher.
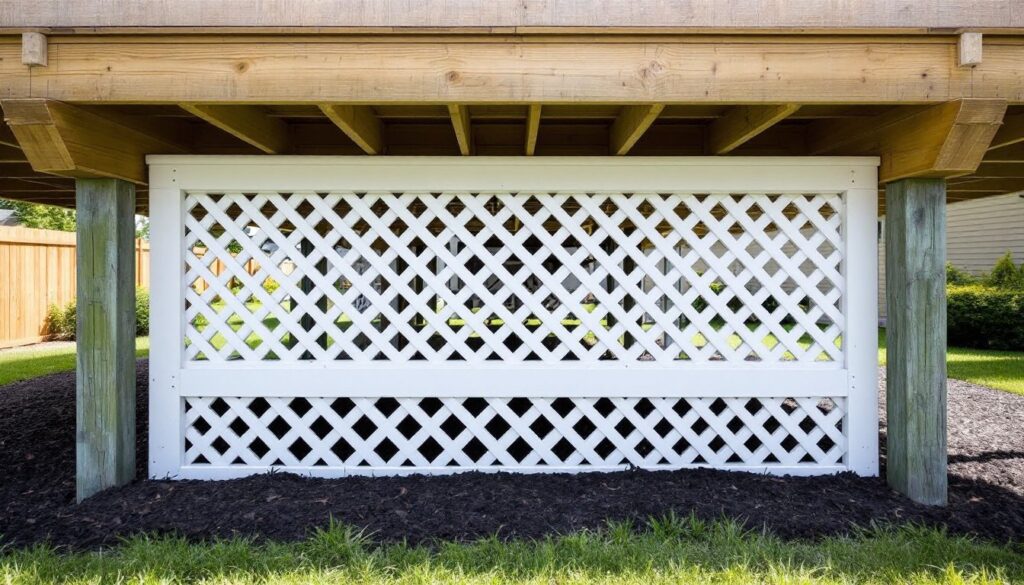
Classic Ground-Level Pallet Deck Designs
Ground-level pallet decks are the simplest build and require no permit in most jurisdictions if they’re under 200 square feet and less than 30 inches high. Start by clearing and leveling the site. Remove sod, roots, and organic material down to bare soil. Lay landscape fabric to suppress weeds, then spread a 2-inch layer of gravel or crushed stone for drainage.
Set concrete deck blocks or pavers every 4 feet in a grid pattern. These provide stable support and keep pallets off the ground to prevent moisture wicking. Check level with a 4-foot spirit level, adjust block height with sand or gravel as needed.
Place pallets on the blocks in your desired layout. A 10×10-foot deck requires approximately six 48×40-inch pallets arranged in a 2×3 grid. Secure pallets to each other using 3-inch exterior deck screws driven through stringers at each corner and midpoint. For added stability, screw pallets down to blocks using galvanized L-brackets.
Fill gaps between pallets with 1×4 treated pine or leftover pallet boards ripped to width. This creates a continuous surface and prevents catching toes or furniture legs. Sand all edges flush, then apply a final coat of sealant or stain.
For a cleaner look, some builders add a border frame using 2×6 treated lumber around the perimeter, screwed into pallet stringers. This also helps contain loose boards and provides a finished edge. Many homeowners looking for southern home design inspiration incorporate this simple ground-level approach for screened porch foundations or poolside seating areas.
Elevated Pallet Deck Ideas for Uneven Terrain
If the ground slopes or you need clearance for drainage, an elevated pallet deck can work, but only up to about 18 inches high without triggering permit and railing requirements in most areas. Check local codes before building.
Start with a simple 4×4 post-and-beam frame. Dig post holes 12 inches deep, set 4×4 pressure-treated posts on concrete footings or gravel, and level them using a transit or water level. Space posts 4 feet apart to match pallet dimensions.
Bolt 2×6 treated joists to the posts using galvanized carriage bolts. Run joists perpendicular to the planned pallet direction, spacing them 16 inches on center for adequate support. This isn’t standard deck framing, pallets add rigidity, but the joists carry the load.
Lay pallets across the joists and screw them down using 3-inch deck screws through the pallet stringers into each joist. Check that stringers align with joists, if not, add blocking or sister a joist to match the pallet layout.
For uneven terrain, you may need posts of varying heights. Cut each post to length after setting, then snap a chalk line across post tops to mark a level plane before attaching joists. This method is detailed in several beginner-friendly building guides that also cover basic post-and-beam carpentry.
Even at 18 inches, consider adding a simple step or ramp for access. A single step can be built from a stacked pallet or a 2×12 tread on concrete blocks. If the deck is over 30 inches, you’ll need a guardrail meeting IRC requirements (36-inch minimum height, balusters spaced no more than 4 inches apart).
Creative Pallet Deck Features and Finishing Touches
Once the deck platform is solid, built-in features add function and character without major cost.
Built-In Seating and Planters
Pallets make excellent bench frames. Stand a pallet vertically along the deck edge, secure it to the deck frame with L-brackets, then cap the top with a 2×10 treated pine bench seat. Add a backrest by screwing a second pallet horizontally to the vertical one at a 100–110 degree angle. Cushions or outdoor fabric can be added for comfort.
For planters, stack two pallets and line the interior with landscape fabric or pond liner. Fill with potting soil and plant trailing flowers or herbs. Secure stacked pallets with corner brackets or threaded rod to prevent tipping. This setup works well along deck perimeters and doubles as a privacy screen when plants mature.
Another option: disassemble pallets and use individual boards to build custom planter boxes sized to fit deck corners or railings. Use exterior wood glue and deck screws, and line boxes with plastic before adding soil to prevent rot.
###Ating and Weatherproofing Options
Outdoor lighting extends deck usability and adds safety. Solar post cap lights install easily on 4×4 posts without wiring. For integrated lighting, run low-voltage LED strip lights under benches or along deck edges. These systems use a 12V transformer and are DIY-friendly, no electrical permit required in most areas.
String lights are another low-cost option. Attach screw hooks or eye bolts to overhead beams or posts, then drape weatherproof LED string lights. Use a timer or photocell to automate lighting.
For weatherproofing, reapply deck sealant or stain every 12–18 months. High-traffic areas will show wear first. Spot-treat splinters or loose boards as they appear, small issues become safety hazards fast.
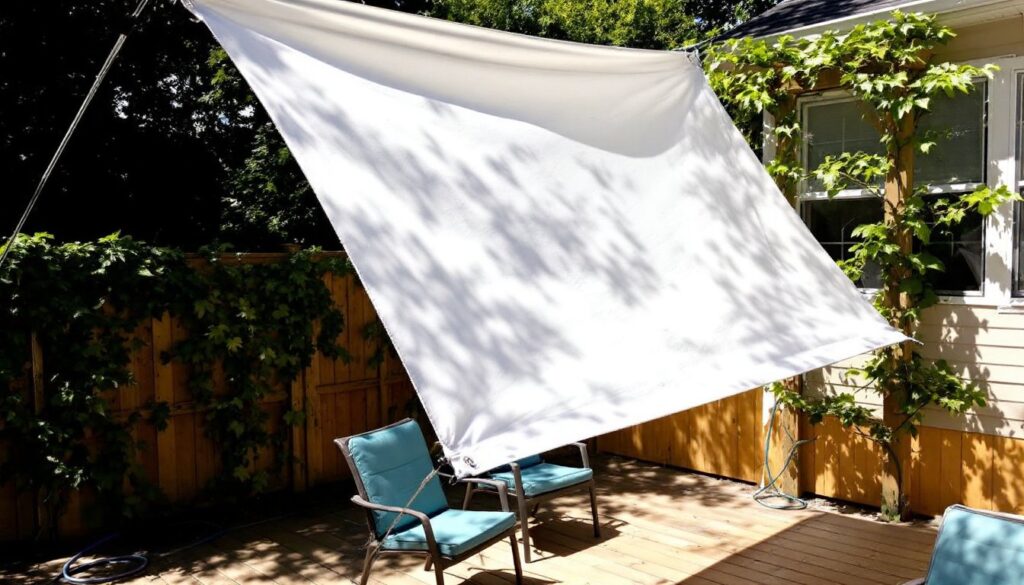
Consider adding a shade structure if the deck sees full sun. A simple pergola built from 2×6 rafters on 4×4 posts provides partial shade and supports climbing plants or retractable shade cloth. Anchor posts to the deck frame or set them on independent footings if the deck framing isn’t rated for lateral loads.